Block Porn & Ads with UniFi + Pi-hole | Protect Your Family

Table of Contents
🙏 Guarding Your Home in a Tempting World
In today’s digital world, temptation is just a click away. As believers walking the Christian path, we are constantly targeted by the enemy through various means — including what we consume online. The internet is full of visual triggers and content designed to draw us away from the will of God.
Thankfully, there are practical ways we can protect ourselves and our families. This post shares one such solution — how to block adult content and intrusive ads on your home network. While you can’t monitor every moment of your family’s internet use, you can build a barrier at home. This is especially helpful for parents seeking to safeguard their children from inappropriate material.
🌐 What is DD-WRT? Upgrading Your Router the Smart Way
DD-WRT is a powerful, open-source firmware that replaces the default software on your wireless router. It unlocks advanced features not typically available with standard firmware — giving you greater control over your home network.
While installing DD-WRT isn’t required to follow this guide, it does offer additional tools to prevent workarounds and bypass attempts. We’ll cover more on that later.
Many common home routers are compatible with DD-WRT, which makes it accessible for most users. However, flashing your router (installing DD-WRT) varies by model, so you’ll need to research specific instructions for your device. This guide won’t walk through that process, but it’s an important step for those seeking a stronger layer of control.
🍓 What Is a Raspberry Pi & Pi-hole?
A Raspberry Pi is a small, low-cost device — essentially a full computer on a compact circuit board. It includes its own CPU, RAM, and storage, and can run various operating systems. In this guide, we’ll be using a Raspberry Pi 3B model to run a powerful network tool called Pi-hole.
🕳️ What Is Pi-hole?
Pi-hole is a Linux network-level advertisement and Internet tracker blocking application which acts as a DNS sinkhole, intended for use on a private network.
Pi-hole is a Linux-based application that blocks internet ads and tracking across your entire network. It acts as a DNS sinkhole, meaning it filters domain name requests (like facebook.com or ads.example.com) before they reach the internet.
Instead of relying on your ISP’s default DNS servers (which resolve domain names into IP addresses), Pi-hole steps in and does this job — with a twist. It uses blocklists to prevent access to domains known for ads, adult content, malware, or other undesired material. If a request matches something on the list, Pi-hole simply blocks it locally.
For example:
When you type google.com in your browser, a DNS server converts that to an IP address like 172.217.10.238. Normally, your router uses your ISP’s DNS for this. But with Pi-hole on your Raspberry Pi, it filters those DNS requests through your chosen blocklists. If the site is on the list, it won’t resolve — effectively blocking access before it even leaves your network.
Most home routers allow you to override the default DNS settings provided by your ISP. This makes it easy to integrate Pi-hole as your network-wide filter — without needing to configure each device individually.

🧑💻 Installing Raspberry Pi OS Lite (64-bit)
Now let’s install the OS for the Raspberry Pi.
🔄 Update Notice (as of 2022-04-04)
Recent builds of Raspberry Pi OS Lite (as of 2022-04-04) have removed the default pi user. Instead, the first-boot wizard now requires you to create a new user account. Additionally, the 64-bit version of Raspberry Pi OS Lite is now the recommended option for most use cases.
Going forward, use the Raspberry Pi Imager (instead of balenaEtcher) to flash your SD card. The Imager allows you to preconfigure a username, password, and enable SSH before booting — making setup much easier.
📥 Step 1: Download Raspberry Pi OS Lite
Download the latest Raspberry Pi OS Lite (64-bit) ZIP file from the official Raspberry Pi website. Save it somewhere easy to remember.
🛠️ Step 2: Flash the OS to Your SD Card
Instead of using balenaEtcher, it’s now recommended to use the Raspberry Pi Imager:
- Download and install the Raspberry Pi Imager from the official page.
- Select the OS ZIP file you just downloaded.
- Choose your SD card as the target.
- Click the gear icon (⚙️) before flashing to:
- Enable SSH
- Set your default username and password
- Configure Wi-Fi (if needed)
- Set your locale and timezone
Once these settings are configured, click Write to flash the image to the SD card.
📂 Step 3: Enable SSH (Manual Method – Optional)
If you’re using balenaEtcher or skipping preconfiguration:
- After flashing, open the boot partition of the SD card in File Explorer.
- Create a new blank file named
ssh(no extension). Ensure “File name extensions” is checked in the View tab of Windows File Explorer. - If it was created as
ssh.txt, simply remove the.txtextension.
This enables headless access, allowing you to manage the Raspberry Pi via SSH from another computer on your network.
🚫 Step 4: Disable Built-in Wi-Fi & Bluetooth (Optional)
If you’re hardwiring the Raspberry Pi with Ethernet and won’t use onboard wireless or Bluetooth, it’s a good idea to disable them for performance and security.
In the SD card’s config.txt file (in the boot partition), scroll to the bottom and add:
# Disable Wi-Fi and Bluetooth
dtoverlay=pi3-disable-wifi
dtoverlay=pi3-disable-bt
📡 Gathering DHCP Information & Setting a Static IP
Before we install Pi-hole, we need to find out what IP address your Raspberry Pi has received from your router, and determine your DHCP range so we can assign a proper static IP.
🔌 Step 1: Connect Your Raspberry Pi to the Network
- Plug your Raspberry Pi into your router using an Ethernet cable.
- Your router should assign it an IP address automatically via DHCP, just like any other device on your network.
🖥️ Step 2: Access Your Router’s Web Interface
- Log into your router’s web console using its IP address (commonly something like
192.168.1.1— for example, on DD-WRT, that’s the default). - Use a browser and go to that address (e.g.,
http://192.168.1.1) and log in.
🔍 Step 3: Find the Raspberry Pi’s IP Address
Once inside the router’s admin panel:
- Navigate to Connected Devices, Device List, or LAN Status (this varies by router).
- Look for the Raspberry Pi entry — it may be listed by hostname or MAC address.
- Note the assigned IP address.
If you’d rather not connect a monitor and keyboard to your Pi, you can now SSH into it using PuTTY on Windows. Just enter the IP address of the Raspberry Pi and log in using the credentials you created during setup.
📏 Step 4: Check Your DHCP Range
While you’re in your router settings, locate your DHCP configuration. You’ll see a range like:
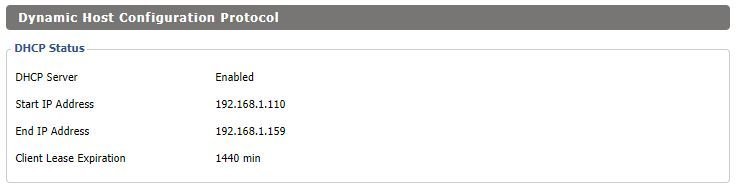
📌 Why This Matters: Choosing a Static IP Outside the Range
We want to assign a static IP to your Raspberry Pi outside the DHCP range, such as 192.168.1.50, to avoid conflicts. If two devices share the same IP address, it can cause network instability.
✅ Note: While DHCP reservations (assigning a static IP based on MAC address) are another option, this guide opts for manually setting the static IP on the Pi for greater control and consistency — especially when running a DNS server like Pi-hole.
📋 Set Up Static IP & DNS in DD-WRT
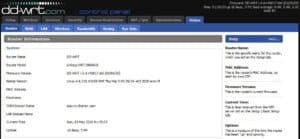
In DD-WRT, you can view your network information by navigating to:
DD-WRT > Status > LAN
Here, you’ll see a list of connected clients, including your Raspberry Pi’s IP address. In my setup, I’ve assigned the Pi a static IP of 192.168.1.101. This IP is then entered under:
DD-WRT > Setup > Basic Setup > Static DNS 1
This means all DNS requests on the network are directed to the Raspberry Pi running Pi-hole.
🧠 Important: Avoid IP Conflicts
Notice that my DHCP range begins at 192.168.1.110, so the Pi’s static IP (192.168.1.101) falls outside the range — ensuring it won’t accidentally be assigned to another device. This is crucial to avoid IP address conflicts on your network.
You’ll want to configure your system similarly:
- Choose a static IP for your Pi that is outside your DHCP pool
- Reserve that IP in your router’s DNS settings (e.g. Static DNS 1)
- Do not change anything yet — for now, just gather the info
To view or edit your DHCP settings:
Go to DD-WRT > Setup > Network Setup
We’ll use this information in the next steps when assigning a static IP and configuring Pi-hole.
🔐 Connect to Your Raspberry Pi via SSH Using PuTTY
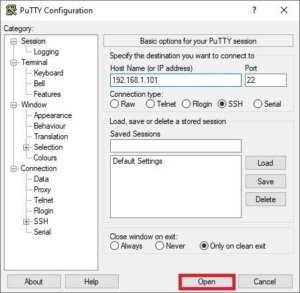
To manage your Raspberry Pi remotely, we’ll connect to it using PuTTY, a free SSH client for Windows.
✅ Step 1: Download and Open PuTTY
- Download PuTTY from the official site: https://www.putty.org
- Launch the app, and in the Host Name (or IP address) field, enter the IP address assigned to your Pi (you found this in your router earlier).
- Keep the port as
22and make sure SSH is selected. - Click Open to connect.
🔑 Step 2: Login Credentials
Once the terminal window opens, log in using:
Username: pi
Password: raspberry
🔄 First-Time Configuration
Change the Default Password
After logging in, change the default password to secure your device:
sudo raspi-configThe Raspberry Pi Software Configuration Tool (raspi-config) window will appear.
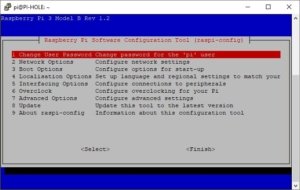
In the config tool:
- Select Option 1 – Change User Password
- Enter your new password when prompted
🕒 Set Your Timezone
In the same config tool:
- Select Option 4 – Localization Options
- Then I2 Change Timezone
- Choose your region (e.g., US > Central)
🖥️ Rename Your Raspberry Pi (Optional)
Change your hostname to something memorable (like pi-hole):
Edit the hostname file:
sudo nano /etc/hostnameReplace the existing name with pi-hole, then press:
Ctrl + XYEnterto save
Update your hosts file:
sudo nano /etc/hostsChange the name next to 127.0.1.1 to match your new hostname.
🔧 Update Raspberry Pi OS & Firmware
sudo apt update && sudo apt upgrade
sudo apt install rpi-eeprom rpi-eeprom-images
sudo rpi-eeprom-update
⚙️ Install and Configure Pi-hole
▶️ Start the Installer
Run the official Pi-hole installation script:
curl -sSL https://install.pi-hole.net | bash🧭 Walk Through the Installer
Follow the prompts:
- Welcome Screen “This installer will transform your device into a network-wide ad blocker!”
✅ Press OK - Donation Notice
✅ Press OK - Static IP Requirement
✅ Press OK - Choose Upstream DNS Provider
- Choose a trusted provider like OpenDNS (ECS)
✅ Press Tab, then OK
- Choose a trusted provider like OpenDNS (ECS)
- Select Blocklists
- Use arrow keys and spacebar to select all lists
✅ Press OK
- Use arrow keys and spacebar to select all lists
- Select Protocols
- Select both IPv4 and IPv6
✅ Press OK
- Select both IPv4 and IPv6
- Set Static IP
- Choose No when asked to use current settings
- Enter an IP address outside your router’s DHCP range (e.g.,
192.168.1.101)
✅ Press OK
- Install Web Admin Interface
- Choose On (Recommended)
✅ Press OK
- Choose On (Recommended)
- Enable Query Logging
- Choose On (Recommended)
✅ Press OK
- Choose On (Recommended)
- Select Privacy Level
- Choose
0 – Show everything
✅ Press OK
✅ Installation Complete
Once Pi-hole finishes installing:
- Your DNS server IP will be shown (e.g.,
192.168.1.101) - You’ll see the Admin Web Interface URL:
http://pi.hole/admin
or
http://192.168.1.101/admin
You’ll also be shown your Admin Web Password.
📌 Copy and save this password!
🔐 Forcing Safe Search with Pi-hole
Even with Pi-hole blocking most explicit content, users can still access inappropriate material through search engines like Google or Bing by turning off SafeSearch. Unfortunately, SafeSearch is not enabled by default.
But don’t worry — we can force SafeSearch at the DNS level using Pi-hole, without relying on external services like CleanBrowsing.
This method allows you to:
- Keep control over your DNS provider
- Enforce SafeSearch on Google, Bing, and YouTube
- Block inappropriate search results across your entire network
🛠️ Step-by-Step: Create a DNS Redirect Config
On your Raspberry Pi, run the following command to create a new Pi-hole configuration file:
sudo nano /etc/dnsmasq.d/05-restrict.confYou’ll add domain redirection rules here to force SafeSearch on search engines.
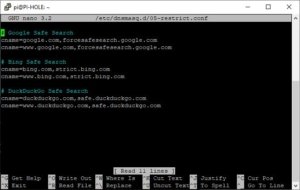
Copy and paste the contents below into the file. Here is a link also worth reading to understand this more, also this link.
🔍 Safe Search CNAME Entries
# Google Safe Search
cname=google.com,forcesafesearch.google.com
cname=www.google.com,forcesafesearch.google.com

# Bing Safe Search
cname=bing.com,strict.bing.com
cname=www.bing.com,strict.bing.com

# DuckDuckGo Safe Search
cname=duckduckgo.com,safe.duckduckgo.com
cname=www.duckduckgo.com,safe.duckduckgo.com
You can also restrict YouTube as well, like blocking the comment sections of videos. We all know how vulgar those can be. I myself do not use this.
# YouTube Restricted
# You can also implement a moderate setting instead. Replace restrict.youtube.com with restrictmoderate.youtube.com
cname=youtube.com,restrictmoderate.youtube.com
cname=www.youtube.com,restrictmoderate.youtube.com
cname=m.youtube.com,restrictmoderate.youtube.com
cname=youtubei.googleapis.com,restrictmoderate.youtube.com
cname=youtube.googleapis.com,restrictmoderate.youtube.com
cname=youtube-nocookie.com,restrictmoderate.youtube.com
cname=www.youtube-nocookie.com,restrictmoderate.youtube.com
🗂️ Hosts File Entries
sudo nano /etc/hostsHere is an example image below.

Add the following to the hosts file.
216.239.38.120  restrict.youtube.com
216.239.38.119  restrictmoderate.youtube.com
216.239.38.120  forcesafesearch.google.com
204.79.197.220  strict.bing.com
40.89.244.237   safe.duckduckgo.com
🔒 Preventing DNS Circumvention via IPTables on DD-WRT
So now that we have everything set what about users trying to get around this? Well users could get around this as client devices have the ability to set custom DNS servers on the network adapter, see below:
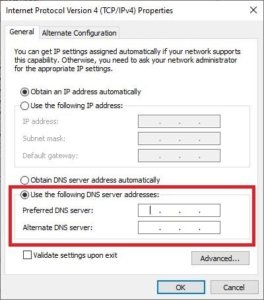
To stop clients from bypassing the Pi-hole by using other DNS servers on port 53, we need a way to block that traffic on DD-WRT.
After some digging and testing, I found a simple solution. Originally, I wanted to redirect DNS requests destined for other servers back to the Pi-hole. Unfortunately, DD-WRT doesn’t support this easily unless you set up VLANs, which can get complicated.
So instead, this method blocks DNS requests to any server other than your Pi-hole. If a client tries to use a different DNS server on port 53, their DNS queries won’t go through — meaning no internet access for them until they switch back.
This is a great way to enforce DNS usage at home, especially if you have tech-savvy users who like to mess with DNS settings!
Just replace 192.168.1.101 in the commands below with your Pi-hole’s IP address.
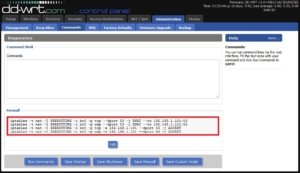
Replace 192.168.1.101 with your Pi-hole’s IP:
iptables -t nat -I PREROUTING -i br0 -p tcp --dport 53 -j DNAT --to 192.168.1.101:53
iptables -t nat -I PREROUTING -i br0 -p udp --dport 53 -j DNAT --to 192.168.1.101:53
iptables -t nat -I PREROUTING -i br0 -p tcp -s 192.168.1.101 --dport 53 -j ACCEPT
iptables -t nat -I PREROUTING -i br0 -p udp -s 192.168.1.101 --dport 53 -j ACCEPT
🛡️ Pi-hole Blocklists
Log into your Pi-hole admin panel, go to:
Settings > Blocklists
Copy and paste all of the URLs below into the input field:
⚠️ Note: These blocklists include ads, tracking, porn, scams, malware, phishing, and more. Your Pi-hole may need significant RAM and CPU to handle millions of entries.
Full list of blocklists (click to expand)
(Due to the length of this content, consider storing the blocklists in a separate .txt file and linking it here.)
Example sources:
https://raw.githubusercontent.com/StevenBlack/hosts/master/hosts
https://mirror1.malwaredomains.com/files/justdomains
http://sysctl.org/cameleon/hosts
https://s3.amazonaws.com/lists.disconnect.me/simple_tracking.txt
https://s3.amazonaws.com/lists.disconnect.me/simple_ad.txt
https://hosts-file.net/ad_servers.txt
https://adaway.org/hosts.txt
https://v.firebog.net/hosts/AdguardDNS.txt
https://v.firebog.net/hosts/Admiral.txt
https://raw.githubusercontent.com/anudeepND/blacklist/master/adservers.txt
https://v.firebog.net/hosts/Easylist.txt
https://pgl.yoyo.org/adservers/serverlist.php?hostformat=hosts&showintro=0&mimetype=plaintext
https://raw.githubusercontent.com/FadeMind/hosts.extras/master/UncheckyAds/hosts
https://raw.githubusercontent.com/bigdargon/hostsVN/master/hosts
https://raw.githubusercontent.com/jdlingyu/ad-wars/master/hosts
https://v.firebog.net/hosts/Easyprivacy.txt
https://v.firebog.net/hosts/Prigent-Ads.txt
https://gitlab.com/quidsup/notrack-blocklists/raw/master/notrack-blocklist.txt
https://raw.githubusercontent.com/FadeMind/hosts.extras/master/add.2o7Net/hosts
https://raw.githubusercontent.com/crazy-max/WindowsSpyBlocker/master/data/hosts/spy.txt
https://hostfiles.frogeye.fr/firstparty-trackers-hosts.txt
https://hostfiles.frogeye.fr/multiparty-trackers-hosts.txt
https://www.github.developerdan.com/hosts/lists/ads-and-tracking-extended.txt
https://raw.githubusercontent.com/Perflyst/PiHoleBlocklist/master/android-tracking.txt
https://raw.githubusercontent.com/Perflyst/PiHoleBlocklist/master/SmartTV.txt
https://raw.githubusercontent.com/Perflyst/PiHoleBlocklist/master/AmazonFireTV.txt
https://raw.githubusercontent.com/DandelionSprout/adfilt/master/Alternate%20versions%20Anti-Malware%20List/AntiMalwareHosts.txt
https://osint.digitalside.it/Threat-Intel/lists/latestdomains.txt
https://s3.amazonaws.com/lists.disconnect.me/simple_malvertising.txt
https://v.firebog.net/hosts/Prigent-Crypto.txt
https://mirror.cedia.org.ec/malwaredomains/immortal_domains.txt
https://www.malwaredomainlist.com/hostslist/hosts.txt
https://bitbucket.org/ethanr/dns-blacklists/raw/8575c9f96e5b4a1308f2f12394abd86d0927a4a0/bad_lists/Mandiant_APT1_Report_Appendix_D.txt
https://phishing.army/download/phishing_army_blocklist_extended.txt
https://gitlab.com/quidsup/notrack-blocklists/raw/master/notrack-malware.txt
https://v.firebog.net/hosts/Shalla-mal.txt
https://raw.githubusercontent.com/Spam404/lists/master/main-blacklist.txt
https://raw.githubusercontent.com/FadeMind/hosts.extras/master/add.Risk/hosts
https://urlhaus.abuse.ch/downloads/hostfile/
https://v.firebog.net/hosts/Prigent-Malware.txt
https://raw.githubusercontent.com/HorusTeknoloji/TR-PhishingList/master/url-lists.txt
https://zerodot1.gitlab.io/CoinBlockerLists/hosts_browser
https://raw.githubusercontent.com/chadmayfield/my-pihole-blocklists/master/lists/pi_blocklist_porn_all.list
https://raw.githubusercontent.com/chadmayfield/my-pihole-blocklists/master/lists/pi_blocklist_porn_top1m.list
https://raw.githubusercontent.com/PolishFiltersTeam/KADhosts/master/KADhosts_without_controversies.txt
https://raw.githubusercontent.com/FadeMind/hosts.extras/master/add.Spam/hosts
https://v.firebog.net/hosts/static/w3kbl.txt
https://raw.githubusercontent.com/matomo-org/referrer-spam-blacklist/master/spammers.txt
https://someonewhocares.org/hosts/zero/hosts
https://raw.githubusercontent.com/vokins/yhosts/master/hosts
https://winhelp2002.mvps.org/hosts.txt
https://hosts.nfz.moe/basic/hosts
https://raw.githubusercontent.com/RooneyMcNibNug/pihole-stuff/master/SNAFU.txt
https://ssl.bblck.me/blacklists/hosts-file.txt
https://blocklist.site/app/dl/ads
https://blocklist.site/app/dl/drugs
https://blocklist.site/app/dl/fraud
https://blocklist.site/app/dl/gambling
https://blocklist.site/app/dl/malware
https://blocklist.site/app/dl/phishing
https://blocklist.site/app/dl/piracy
https://blocklist.site/app/dl/porn
https://blocklist.site/app/dl/proxy
https://blocklist.site/app/dl/ransomware
https://blocklist.site/app/dl/redirect
https://blocklist.site/app/dl/scam
https://blocklist.site/app/dl/spam
https://blocklist.site/app/dl/torrent
https://blocklist.site/app/dl/tracking
https://raw.githubusercontent.com/PolishFiltersTeam/KADhosts/master/KADhosts.txt
https://raw.githubusercontent.com/VeleSila/yhosts/master/hosts
https://v.firebog.net/hosts/neohostsbasic.txt
https://paulgb.github.io/BarbBlock/blacklists/hosts-file.txt
https://hostsfile.mine.nu/hosts0.txt
https://v.firebog.net/hosts/BillStearns.txt
https://hostsfile.org/Downloads/hosts.txt
https://www.joewein.net/dl/bl/dom-bl-base.txt
https://v.firebog.net/hosts/Kowabit.txt
https://adblock.mahakala.is
https://raw.githubusercontent.com/Kees1958/W3C_annual_most_used_survey_blocklist/master/TOP_EU_US_Ads_Trackers_HOST
https://v.firebog.net/hosts/Airelle-trc.txt
https://v.firebog.net/hosts/Airelle-hrsk.txt
https://raw.githubusercontent.com/tg12/pihole-phishtank-list/master/list/phish_domains.txt
https://github.com/Ewpratten/youtube_ad_blocklist/blob/master/blocklist.txt
https://gist.githubusercontent.com/anudeepND/adac7982307fec6ee23605e281a57f1a/raw/5b8582b906a9497624c3f3187a49ebc23a9cf2fb/Test.txt
https://blocklistproject.github.io/Lists/ads.txt
🔓 Whitelisting Domains
Go to:
Query Log → Identify incorrectly blocked domains → Click Whitelist
Additionally, consult:
👉 Commonly Whitelisted Domains
You will find certain sites and services won’t work anymore. You will need to whitelist them, head over here for a list of Commonly Whitelisted Domains. You can also check the Query Log and see what domains were blocked and whitelist those with the button, then test your site or service.
👨👩👧👦 Family Shield DNS | Upstream DNS Configuration
Go to:
Settings > DNS > Upstream DNS Servers
Use OpenDNS FamilyShield:
Custom 1 (IPv4) - 208.67.222.123
Cusotm 2 (IPv4) - 208.67.220.123
✔️ Verifying Configuration
With everything configured, you may need to restart the Pi with the following command:
sudo rebootYou may also need to flush the DNS cache on your computer, open Command Prompt and run the following command:
ipconfig /flushdnsSo first we should test Pi-Hole and make sure it’s blocking things like ads. Go to this website to test ad blocking. You should see queries being generated on the Pi-Hole Admin Webpage.
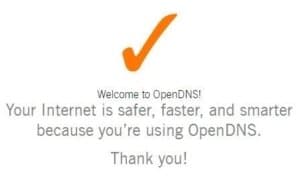
Now let’s test that we’re using the Upstream DNS servers we configured, OpenDNS Family Shield, go to this website, you should get an orange checkmark like below:
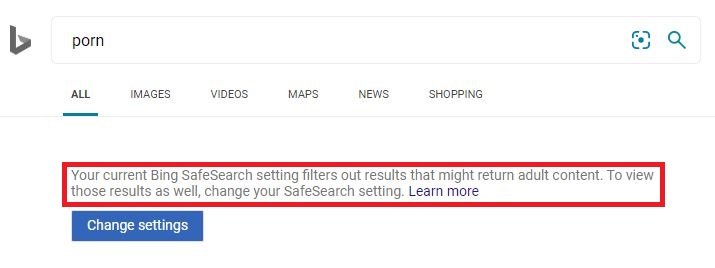
Now let’s test Safe Search being forced. Do some searches on Google, Bing, DuckDuckGo, and YouTube if you did that as well and see if you can pull adult content in the search results and image searches. You shouldn’t be able to.

Bing
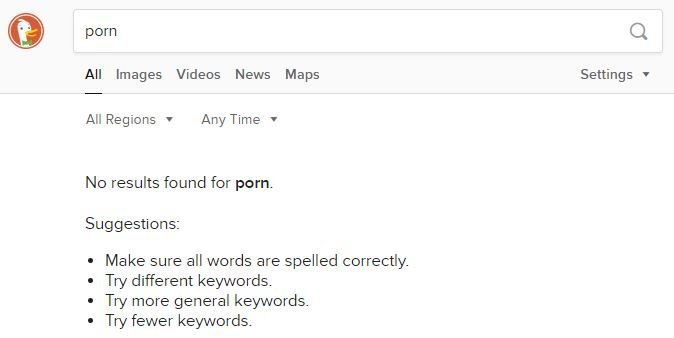
DuckDuckGo
Now, let’s test our DNS circumvention prevention. I went ahead and set a custom DNS server on my computer’s network adapter—specifically, 8.8.8.8, which is Google’s public DNS server (as shown in a previous example). When I tried to load google.com in a browser, it failed to connect. I also tried pinging google.com directly, which didn’t work either.
Interestingly, I was still able to ping 8.8.8.8 itself. That’s because ping uses ICMP requests, which we aren’t blocking. Our rule specifically blocks DNS traffic on port 53 to any IP address other than 192.168.1.101 (the Pi-hole’s IP). So, any DNS requests sent to other servers like 8.8.8.8 get blocked, effectively stopping DNS circumvention.

Another thing we can do is ping google.com, bing.com and duckduckgo.com and see if those resolve to their safe search domain names we configured.
nslookup google.com

Server: PI-HOLE
Address: 192.168.1.101
Name: forcesafesearch.google.com
Address: 216.239.38.120
Aliases: google.com

nslookup bing.com

Server: PI-HOLE
Address: 192.168.1.101
Name: strict.bing.com
Address: 204.79.197.220
Aliases: bing.com

nslookup duckduckgo.com

Server: PI-HOLE
Address: 192.168.1.101
Name: safe.duckduckgo.com
Address: 40.89.244.237
Aliases: duckduckgo.com
You can see above with the nslookup command that when I ping Google, Bing, or DuckDuckGo it resolves to their Safe or Strict counterparts and the request is hitting the Pi-Hole device as the DNS server. That is success!
⚙️ Updating Pi-Hole
Connect to the Pi via SSH and login, below you will find the commands.
pihole -up : Updating Pi-Hole software to the latest version.
pihole -v : Verify that you have the latest version of Pi-hole already installed.

If using the PADD screen add-on with some kits:
cd ~
wget -N https://raw.githubusercontent.com/jpmck/PADD/master/padd.sh
sudo reboot
💾 Backing Up Your Work
It should be noted that this process took a lot of work and time to get right, and SD cards aren’t known for lasting forever. Therefore, it’s crucial to create a backup of the SD card.
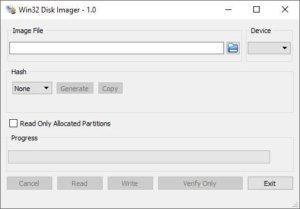
For this, we can use Win32 Disk Imager. You can find a portable version online, but I won’t be linking unofficial builds here. You’ll want the Win32DiskImager-1.0.0-binary version.
Insert the SD card into your computer, note the drive letter assigned to it, then select that drive under Device in Win32 Disk Imager. Next, click the folder icon to choose where you want to save the backup file, then hit Read to create the backup.
✅ Conclusion
By carefully configuring your Pi-Hole and network settings, and taking the time to back up your system, you can ensure a robust, reliable, and secure DNS filtering setup. This not only helps maintain control over your network but also provides peace of mind knowing your configurations are safely preserved. With these steps, you’re well on your way to a smarter, safer home network.
🌿 Final Thoughts
Setting up and securing your Pi-Hole can seem challenging at first, but the effort pays off with a cleaner, faster, and safer browsing experience for everyone on your network. Remember, patience and careful testing are key to getting everything just right. Keep your backups updated, stay vigilant against DNS circumvention, and enjoy the benefits of a well-managed network!
My name is Dex, author at WinReflection.
I am a Christian, conservative, truth-seeker, and problem-solver who is not afraid to be vocal about important or controversial issues—silence leads to death. There’s more to life than the worldly status quo, and that’s why many are sad and depressed—they’re suffocating. Truth and purpose can bring fresh air into one’s life, and that’s my mission. My sidebar content should not trigger you, the proof is all there.
📖 John 3:16: For God so loved the world that he gave his one and only Son, that whoever believes in him shall not perish but have eternal life.
Very cool post thanks for the read.