
Advanced Asset Management with Datto RMM UDFs

Table of Contents
🚀 Empowering IT with Insight
While Datto RMM provides a wealth of data for each endpoint, I want to highlight the User-Defined Fields (UDFs) feature. It has significantly streamlined my workflow by allowing me to surface essential device information directly on the summary page—eliminating the need to dig through multiple tabs. Plus, this data can easily be exported to Excel for reporting and auditing.
🛠️ Exploring the Component Store
The ComStore offers a rich library of community-contributed components that you can add directly to your portal. Examples include:
- TPM status and BitLocker recovery keys
- Office and Windows product keys
- Activation status and Windows 11 compatibility checks
- Backup product detection, and much more
Simply browse the ComStore and add the components you need.
⚙️ Setting Up UDF Jobs
Under the Administrator account for your portal, go to:
- Setup -> Account Settings -> User-Defined Fields
This is where you will label the header for the value of data that will be in the field, but this is not where you will configure UDFs. Configuring them will be done under Jobs.
In Jobs, create a new job called, “Managed IT [All] – Custom UDFs – Initial Audit” and for Job targets add the following:
- Default Device Filters (All Sites): All Windows Servers
- Default Device Filters (All Sites): All Windows Desktops
For a schedule set it for, “Once an initial audit has completed”. This means whenever a new device is added the job will run and add the UDFs.
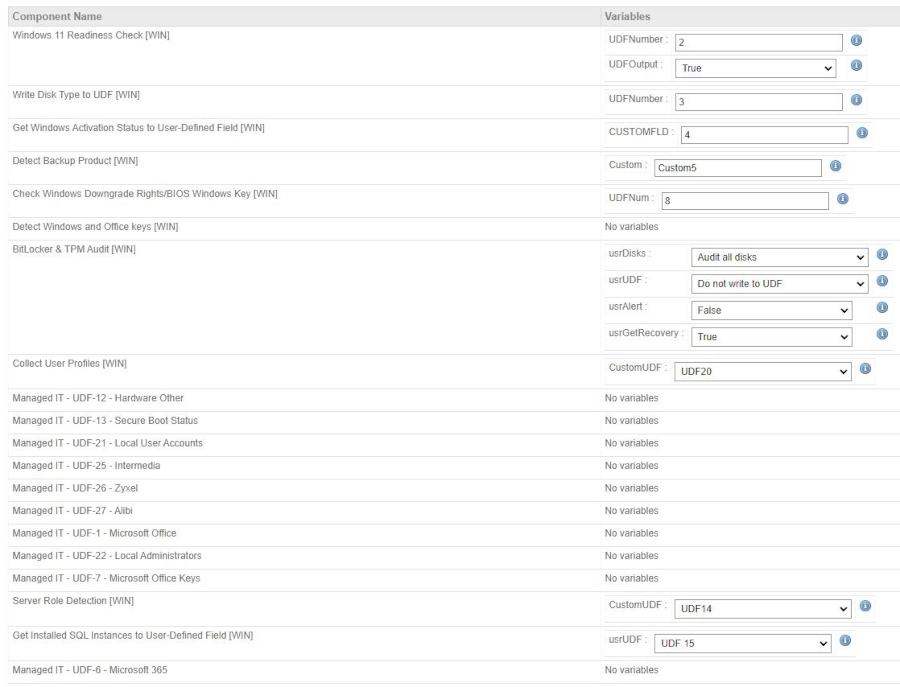
You can also repeat the process with a job called, “Managed IT [All] – Custom UDFs – Schedule” where you can set a time each day that Datto RMM will run the UDF scripts for each device to keep the UDFs updated daily. Here is a screenshot of my configuration.
📋 UDF Output Example
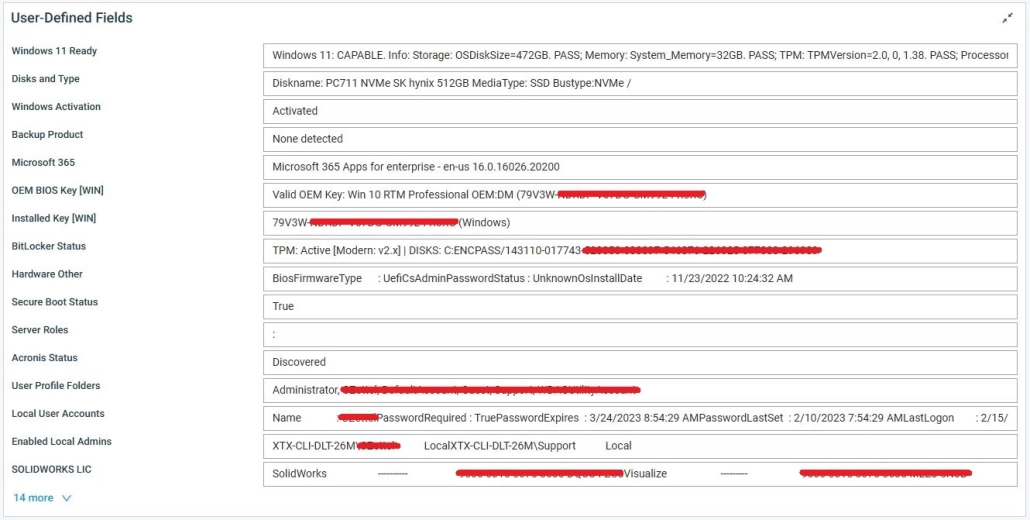
Here’s a look at what UDFs can deliver on an endpoint summary (sensitive data omitted):
You’ll see detailed information like:
- SSD presence
- BitLocker status and recovery key
- Activation method
- BIOS mode (UEFI/Legacy) and Secure Boot status
- OEM and registry-based Windows product keys
- Local user profiles and administrator accounts
All fields are stored as UDF columns and can be exported to Excel—ideal for auditing or disaster recovery (e.g., lost BitLocker keys or product keys).
🧪 Custom UDFs with PowerShell
Notice the components prefixed with “Managed IT”? These are custom scripts I’ve written—they’re not available in the ComStore. These scripts collect data and write it to the registry under a chosen UDF number.
🔐 Example: Local Administrators Script
# Get All Local Administrators

$ErrorActionPreference = 'SilentlyContinue'

# Get All Local Administrators
$Administrators = Get-LocalGroupMember -Group "Administrators" | Select-Object Name | Format-Table -HideTableHeaders

# Output
$AdministratorsList = ($Administrators | Out-String).Trim(); $AdministratorsList

# Validate the UDF Variable
[int]$env:usrUDF = '22'
if ([int]$env:usrUDF -and [int]$env:usrUDF -match '^\d+$') {

    # Validate the variable value is between 1 and 30
    if ([int]$env:usrUDF -ge 1 -and [int]$env:usrUDF -le 30) {
            New-ItemProperty -Path "HKLM:\SOFTWARE\CentraStage" -Name Custom$env:usrUDF -Value $AdministratorsList -Force | Out-Null
            Write-Host "Value written to User-Defined Field $env:usrUDF`."
        }
    else {
        Write-Host "User-Defined Field value must be an integer between 1 and 30."
    }
} else {
    Write-Host "User-Defined Field value invalid or not specified. Not writing results to the User-Defined Field."
}
This script can be easily adapted for other data types. Just update the logic, variable, and UDF number.
📦 Component UDF Scripts
Below are various custom PowerShell scripts I use to populate different UDFs. Insert them before the # Validate the UDF Variable section in the example above and assign the correct UDF number.
🧩 UDF 1 – Microsoft Office Installed
# Get Microsoft Office Products Installed

$ErrorActionPreference = 'SilentlyContinue'

# Get Microsoft Office Products Installed
$Microsoft32Bit = Get-ItemProperty HKLM:\SOFTWARE\Wow6432Node\Microsoft\Windows\CurrentVersion\Uninstall\* | where{$_.DisplayName -LIKE 'Microsoft Office P*' -or $_.DisplayName -LIKE 'Microsoft Office H*' -or $_.DisplayName -LIKE 'Microsoft Office S*' -or $_.DisplayName -LIKE 'Microsoft Visio*' -or $_.DisplayName -LIKE 'Microsoft Lync*' -or $_.DisplayName -LIKE 'Microsoft P*' -or $_.DisplayName -LIKE 'Microsoft O*' -or $_.DisplayName -LIKE 'Microsoft Access*' -or $_.DisplayName -LIKE 'Microsoft Excel*' -or $_.DisplayName -LIKE 'Microsoft Word*' -or $_.DisplayName -LIKE 'Microsoft InfoPath*'} | Select-Object DisplayName, DisplayVersion | Format-Table -HideTableHeaders
$Microsoft64Bit = Get-ItemProperty HKLM:\SOFTWARE\Microsoft\Windows\CurrentVersion\Uninstall\* | where{$_.DisplayName -LIKE 'Microsoft Office P*' -or $_.DisplayName -LIKE 'Microsoft Office H*' -or $_.DisplayName -LIKE 'Microsoft Office S*' -or $_.DisplayName -LIKE 'Microsoft Visio*' -or $_.DisplayName -LIKE 'Microsoft Lync*' -or $_.DisplayName -LIKE 'Microsoft P*' -or $_.DisplayName -LIKE 'Microsoft O*' -or $_.DisplayName -LIKE 'Microsoft Access*' -or $_.DisplayName -LIKE 'Microsoft Excel*' -or $_.DisplayName -LIKE 'Microsoft Word*' -or $_.DisplayName -LIKE 'Microsoft InfoPath*'} | Select-Object DisplayName, DisplayVersion | Format-Table -HideTableHeaders

# Merge Values and Output
$Microsoft = ($Microsoft32Bit, $Microsoft64Bit | Out-String).Trim(); $Microsoft
☁️ UDF 6 – Microsoft 365 Products
# Get Microsoft Office 365 Products Installed

$ErrorActionPreference = 'SilentlyContinue'

# Get Microsoft Office 365 Products Installed
$Microsoft32Bit = Get-ItemProperty HKLM:\SOFTWARE\Wow6432Node\Microsoft\Windows\CurrentVersion\Uninstall\* | where{$_.DisplayName -like 'Microsoft 365*'} | Select-Object DisplayName, DisplayVersion | Format-Table -HideTableHeaders
$Microsoft64Bit = Get-ItemProperty HKLM:\SOFTWARE\Microsoft\Windows\CurrentVersion\Uninstall\* | where{$_.DisplayName -like 'Microsoft 365*'} | Select-Object DisplayName, DisplayVersion | Format-Table -HideTableHeaders

# Merge Values and Output
$Microsoft365 = ($Microsoft32Bit, $Microsoft64Bit | Out-String).Trim(); $Microsoft365
🔑 UDF 7 – Microsoft Office Product Key
# Get Microsoft Office Product Keys:

$ErrorActionPreference = 'SilentlyContinue'

function Search-RegistryKeyValues {
param(
[string]$Path,
[string]$valueName
)
Get-ChildItem $Path -recurse -ea SilentlyContinue |
% {
if ((Get-ItemProperty -Path $_.PsPath -ea SilentlyContinue) -match $valueName)
{
$_.PsPath
}
}
}

# Find registry key that has value: "digitalproductid"
# 32-Bit Versions:
$Key = Search-RegistryKeyValues "HKLM:\SOFTWARE\Microsoft\Office" "digitalproductid"
if ($Key -eq $null) {
# 64-Bit Versions:
$Key = Search-RegistryKeyValues "HKLM:\SOFTWARE\WOW6432Node\Microsoft\Office" "digitalproductid"
if ($Key -eq $null) {Write-Host "Microsoft Office is NOT Installed.";break}
}

$ValueData = (Get-ItemProperty $Key).digitalproductid[52..66]

# Decrypt Base24 Encoded Binary Data:

$ProductKey = ""
$Chars = "BCDFGHJKMPQRTVWXY2346789"
for ($i = 24; $i -ge 0; $i--) {
$r = 0
for ($j = 14; $j -ge 0; $j--) {
$r = ($r * 256) -bxor $ValueData[$j]
$ValueData[$j] = [math]::Truncate($r / 24)
$r = $r % 24
}
$ProductKey = $Chars[$r] + $ProductKey
if (($i % 5) -eq 0 -and $i -ne 0) {
$ProductKey = "-" + $ProductKey
}
}

$MSOfficeKey = ($ProductKey | Out-String).Trim(); $MSOfficeKey
🧬 UDF 12 – BIOS Firmware Type
# Get BIOS Firmware Type

$ErrorActionPreference = 'SilentlyContinue'

(Get-ComputerInfo -Property BiosFirmwareType | Format-Table -HideTableHeaders | Out-String).Trim().ToUpper()
🛡️ UDF 13 – Secure Boot Status
# Get Secure Boot Status

$ErrorActionPreference = 'SilentlyContinue'

(Confirm-SecureBootUEFI | Out-String).Trim()
👤 UDF 21 – Enabled Local User Accounts
# Get Enabled Local Users

$ErrorActionPreference = 'SilentlyContinue'

(Get-LocalUser | where{$_.Enabled -eq 'True'} | Select-Object Name | Format-Table -HideTableHeaders | Out-String).Trim()
👑 UDF 22 – All Local Administrators
# Get All Local Administrators

$ErrorActionPreference = 'SilentlyContinue'

(Get-LocalGroupMember Administrators | Select-Object Name, PrincipalSource | Format-Table -HideTableHeaders | Out-String).Trim()
✅ UDF 23 – Enabled Local Administrators
# Get Enabled Local Administrators

$ErrorActionPreference = 'SilentlyContinue'

(Get-LocalGroupMember Administrators | where{(Get-LocalUser $_.SID -EA 0).Enabled} | Select-Object Name | Format-Table -HideTableHeaders | Out-String).Trim()
☁️ UDF 25 – Installed Intermedia Products
# Get Intermedia Products Installed

$ErrorActionPreference = 'SilentlyContinue'

# Get Intermedia Products Installed
$Intermedia32Bit = Get-ItemProperty HKLM:\SOFTWARE\Wow6432Node\Microsoft\Windows\CurrentVersion\Uninstall\* | where{$_.Publisher -like 'Intermedia*'} | Select-Object DisplayName, DisplayVersion | Format-Table -HideTableHeaders
$Intermedia64Bit = Get-ItemProperty HKLM:\Software\Microsoft\Windows\CurrentVersion\Uninstall\* | where{$_.Publisher -like 'Intermedia*'} | Select-Object DisplayName, DisplayVersion | Format-Table -HideTableHeaders

# Merge Values and Output
$Intermedia = ($Intermedia32Bit, $Intermedia64Bit | Out-String).Trim(); $Intermedia
📡 UDF 26 – Zyxel Products Installed
# Get Zyxel Products Installed

$ErrorActionPreference = 'SilentlyContinue'

# Get Zyxel Products Installed
$Zyxel32Bit = Get-ItemProperty HKLM:\Software\Wow6432Node\Microsoft\Windows\CurrentVersion\Uninstall\* | where{$_.Publisher -like 'Zyxel*'} | Select-Object DisplayName, DisplayVersion | Format-Table -HideTableHeaders
$Zyxel64Bit = Get-ItemProperty HKLM:\SOFTWARE\Microsoft\Windows\CurrentVersion\Uninstall\* | where{$_.Publisher -like 'Zyxel*'} | Select-Object DisplayName, DisplayVersion | Format-Table -HideTableHeaders

# Merge Values and Output
$Zyxel = ($Zyxel32Bit, $Zyxel64Bit | Out-String).Trim(); $Zyxel
🎥 UDF 27 – Alibi (Observint) Products Installed
# Get Alibi Products Installed

$ErrorActionPreference = 'SilentlyContinue'

# Get Alibi Products Installed
$Alibi32Bit = Get-ItemProperty HKLM:\Software\Wow6432Node\Microsoft\Windows\CurrentVersion\Uninstall\* | where{$_.Publisher -like 'Observint Technologies*'} | Select-Object DisplayName, DisplayVersion | Format-Table -HideTableHeaders
$Alibi64Bit = Get-ItemProperty HKLM:\SOFTWARE\Microsoft\Windows\CurrentVersion\Uninstall\* | where{$_.Publisher -like 'Observint Technologies*'} | Select-Object DisplayName, DisplayVersion | Format-Table -HideTableHeaders

# Merge Values and Output
$Alibi = ($Alibi32Bit, $Alibi64Bit | Out-String).Trim(); $Alibi
🛠️ UDF 28 – SolidWorks Serial Numbers
# Get Solidworks Serial Numbers

$ErrorActionPreference = 'SilentlyContinue'

# Get Solidworks Serial Numbers
$SolidworksMain = Get-ItemProperty -Path "HKLM:\SOFTWARE\SolidWorks\Licenses\Serial Numbers" -Name "SolidWorks" | Select-Object Solidworks | Format-Table
$SolidworksVisualize = Get-ItemProperty -Path "HKLM:\SOFTWARE\SolidWorks\Licenses\Serial Numbers" -Name "Visualize" | Select-Object Visualize | Format-Table

# Merge Values and Output
$SolidworksSerials = ($SolidworksMain, $SolidworksVisualize | Out-String).Trim(); $SolidworksSerials
✅ Conclusion
These UDF scripts provide a streamlined and reliable way to audit and retrieve critical software and licensing information across managed endpoints. By leveraging PowerShell and targeting key registry locations, IT administrators can gain quick visibility into installed applications and license compliance—enabling better support, security, and asset tracking across the organization.
🌿 Final Thoughts
These UDF scripts are more than just tools—they’re enablers of smarter IT management. By automating the discovery of installed applications and license details, they reduce manual effort, increase visibility, and support proactive decision-making. Integrating them into your workflow empowers your team to stay ahead of audits, streamline support, and maintain greater control over your IT environment.
My name is Dex, author at WinReflection.
I am a Christian, conservative, truth-seeker, and problem-solver who is not afraid to be vocal about important or controversial issues—silence leads to death. There’s more to life than the worldly status quo, and that’s why many are sad and depressed—they’re suffocating. Truth and purpose can bring fresh air into one’s life, and that’s my mission. My sidebar content should not trigger you, the proof is all there.
📖 John 3:16: For God so loved the world that he gave his one and only Son, that whoever believes in him shall not perish but have eternal life.
Hi,
I found the article really useful. Thanks for placing it.
Is there any way to read the value of a User defined field and based on it modify another User defined field?
example: I have the purchase date of laptops and desktops in a User defined field. I created another field named “Marked for replacement”.
I want to use this purchase date to calculate if device needs to be replaced already or not, and if that’s the case modify the field “Marked for replacement”. Life could be different for laptops, let’s say 3 years, while for desktops it can be 4 years. Therefore I also need to check the “Device Type” field to do the calculation.
I think it can be done, but I didn’t find the way to obtain the data from those user defined fields from an script.
Can you help me or provide me some guidance?
Thanks a lot!