 flaticon.com
Windows 10 1803 | Unattended Installation
Table of Contents
INTRO

Automating a clean installation of Windows 10 can be done without SCCM or MDT. In order to accomplish this, we just need to create an Answer File and place it where Windows Setup will be able to find it during the installation of Windows. In order to create an Answer File, we are going need Windows System Image Manager (WSIM) and Windows 10 installation source files from a disc-image ISO file or physical DVD.
WSIM can be obtained by downloading the Windows Assessment and Deployment Kit (Windows ADK) for your version of Windows 10 and the version you wish to deploy to. Once you have downloaded Windows ADK and have your Windows 10 ISO image file or DVD ready, we can begin.
BEFORE GENERATING A CATALOG FILE (.CLG)
We will first need to use WSIM to generate a Catalog File (.clg). This file will contain the state of all packages and components of the image (.wim) used. In a standard untouched Windows 10 ISO image, this will be the “install.wim” file under the “Sources” folder of your source files.
I should note that it would be wise to perhaps integrate the latest updates into your install.wim before generating a Catalog File as there could be some important bug fixes and patches that resolve some issues when utilizing certain features in an Answer File. This can be done with third-party software like NTLite, or manually with DISM commands like below:
Installing Windows Updates Offline:
Dism /Get-ImageInfo /imagefile:"W:\CESE_X64FREE_EN-US_DV5\Source\sources\install.wim"
Dism /Mount-Image /ImageFile:"W:\CESE_X64FREE_EN-US_DV5\Source\sources\install.wim" /Index:6 /MountDir:"W:\CESE_X64FREE_EN-US_DV5\Mount"
Dism /Add-Package /Image:"W:\CESE_X64FREE_EN-US_DV5\Mount" /PackagePath:"W:\CESE_X64FREE_EN-US_DV5\Updates" /LogPath:"W:\CESE_X64FREE_EN-US_DV5\Updates\AddPackage.log"
Dism /Image:"W:\CESE_X64FREE_EN-US_DV5\Mount" /Cleanup-Image /StartComponentCleanup /ResetBase
Dism /Unmount-Image /MountDir:"W:\CESE_X64FREE_EN-US_DV5\Mount" /Commit
Integrating Drivers Offline
Additionally, if you find that you need to integrate drivers into the boot.wim image you can use the following commands:
Dism /Get-ImageInfo /imagefile:"W:\CESE_X64FREE_EN-US_DV5\Source\sources\boot.wim"
Dism /Mount-Image /ImageFile:"W:\CESE_X64FREE_EN-US_DV5\Source\sources\boot.wim" /Index:2 /MountDir:"W:\CESE_X64FREE_EN-US_DV5\Mount"
Dism /Image:"W:\CESE_X64FREE_EN-US_DV5\Mount" /Add-Driver /Driver:"W:\CESE_X64FREE_EN-US_DV5\Drivers" /Recurse
Dism /Unmount-Image /MountDir:"W:\CESE_X64FREE_EN-US_DV5\Mount" /Commit
Also, you should generate a Catalog File on a system with the same architecture as your Windows 10 ISO disc-image or DVD. So, if my ISO is x64 based, then I will want to generate a Catalog File with WSIM on an x64 based Operating System.
GENERATE A CATALOG FILE (.CLG)
With all of that out of the way, let’s begin!
- Browse to the location of your Windows ADK download, then install WSIM.
- Install “Windows Kits\10\ADK\Installers\Windows System Image Manager on amd64-x86_en-us.msi”.
- Then launch “C:\Program Files (x86)\Windows Kits\10\Assessment and Deployment Kit\Deployment Tools\WSIM\imgmgr.exe”.
Now we are going to want to generate a Catalog File. So, mount your Windows 10 ISO file or insert your DVD. In Windows 8.1 and Windows 10 you can simply right-click and select “Mount “. In this guide I will be using the official Windows 10 1803 ISO file directly from Microsoft’s website. When mounted, the volume name is “CCCOMA_X64FRE_EN-US_DV9”. I will now create a folder with that name and copy the contents of the ISO to it. This is because by default WSIM will save the Catalog File to the directory where the image is, next to the install.wim.
Under the “Windows Image” section, right-click “Select a Windows image or catalog file”, then click “Select Windows Image…” then browse to the install.wim image. Then select the edition of Windows you wish to generate a Catalog File. In this guide it will be “Windows 10 Pro”.
Then click “Yes” to the following message:
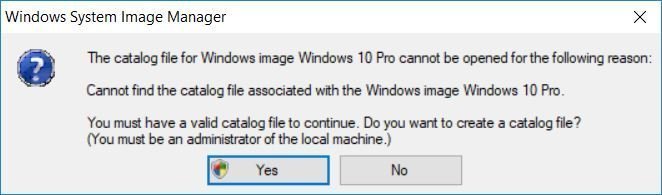
WSIM will now generate the Catalog File, and when done, the file “install_Windows 10 Pro.clg” will now be in my “W:\CCCOMA_X64FRE_EN-US_DV9\sources” folder. Save it, as you may need it in the future.
You will now see the progress of the operation take place. It will take a couple of minutes so let it do its thing.
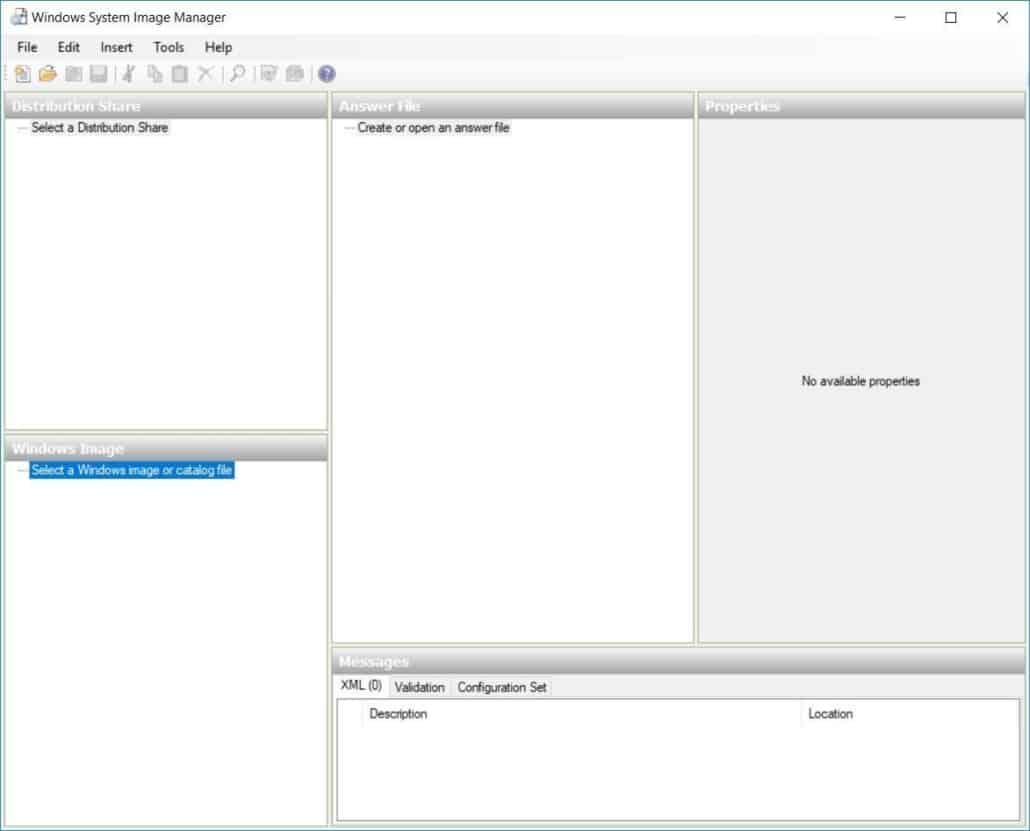
CREATE AN ANSWER FILE (.XML)
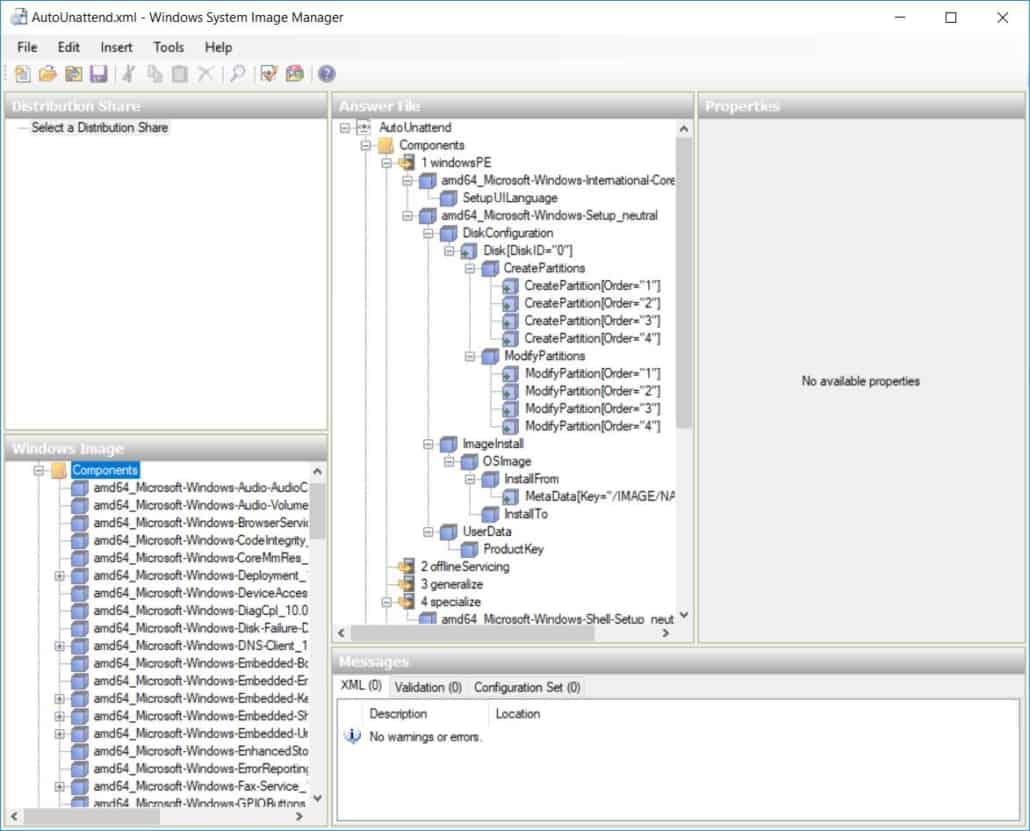
Now under the “Answer File” section right-click “Create or open an answer file”. Then click “New Answer File…”. You will now need to add the components you want to the Answer File. As you will see below, it’s tree structured in a way and each block has a purpose.
Now, I am not going tell you each one to do, you will have to look at my Answer Files posted below and build your own. You could actually just copy mine and work it for your needs if you wanted. You can search information above each component and their values as well.
Now I have already went ahead and created the Answer Files and tested them in Virtual Box for both Legacy BIOS and UEFI booting. I even added some extras! How cool am I? So basically, I will now post both my Answer Files.
Simply copy the text of the one you need and paste into a text document and name the document, “AutoUnattend.xml”.
AutoUnattend.xml – BIOS – Windows 10 – 1803:
<?xml version="1.0" encoding="utf-8"?>
<unattend xmlns="urn:schemas-microsoft-com:unattend">
    <settings pass="windowsPE">
        <component name="Microsoft-Windows-Setup" processorArchitecture="amd64" publicKeyToken="31bf3856ad364e35" language="neutral" versionScope="nonSxS" xmlns:wcm="http://schemas.microsoft.com/WMIConfig/2002/State" xmlns:xsi="http://www.w3.org/2001/XMLSchema-instance">
            <DiskConfiguration>
                <Disk wcm:action="add">
                    <CreatePartitions>
                        <CreatePartition wcm:action="add">
                            <Type>Primary</Type>
                            <Size>512</Size>
                            <Order>1</Order>
                        </CreatePartition>
                        <CreatePartition wcm:action="add">
                            <Extend>false</Extend>
                            <Type>Primary</Type>
                            <Size>1024</Size>
                            <Order>2</Order>
                        </CreatePartition>
                        <CreatePartition wcm:action="add">
                            <Extend>true</Extend>
                            <Type>Primary</Type>
                            <Order>3</Order>
                        </CreatePartition>
                    </CreatePartitions>
                    <ModifyPartitions>
                        <ModifyPartition wcm:action="add">
                            <Active>true</Active>
                            <Format>NTFS</Format>
                            <Label>System</Label>
                            <Extend>false</Extend>
                            <Order>1</Order>
                            <PartitionID>1</PartitionID>
                        </ModifyPartition>
                        <ModifyPartition wcm:action="add">
                            <Format>NTFS</Format>
                            <TypeID>0x27</TypeID>
                            <Label>Recovery</Label>
                            <Order>2</Order>
                            <PartitionID>2</PartitionID>
                        </ModifyPartition>
                        <ModifyPartition wcm:action="add">
                            <Format>NTFS</Format>
                            <Letter>C</Letter>
                            <Order>3</Order>
                            <PartitionID>3</PartitionID>
                            <Label>Windows</Label>
                        </ModifyPartition>
                    </ModifyPartitions>
                    <DiskID>0</DiskID>
                    <WillWipeDisk>true</WillWipeDisk>
                </Disk>
                <WillShowUI>OnError</WillShowUI>
            </DiskConfiguration>
            <ImageInstall>
                <OSImage>
                    <InstallFrom>
                        <MetaData wcm:action="add">
                            <Key>/IMAGE/NAME</Key>
                            <Value>Windows 10 Pro</Value>
                        </MetaData>
                    </InstallFrom>
                    <InstallTo>
                        <DiskID>0</DiskID>
                        <PartitionID>3</PartitionID>
                    </InstallTo>
                    <WillShowUI>OnError</WillShowUI>
                    <InstallToAvailablePartition>false</InstallToAvailablePartition>
                </OSImage>
            </ImageInstall>
            <UserData>
                <ProductKey>
                    <WillShowUI>OnError</WillShowUI>
                    <Key>VK7JG-NPHTM-C97JM-9MPGT-3V66T</Key>
                </ProductKey>
                <AcceptEula>true</AcceptEula>
            </UserData>
        </component>
        <component name="Microsoft-Windows-International-Core-WinPE" processorArchitecture="amd64" publicKeyToken="31bf3856ad364e35" language="neutral" versionScope="nonSxS" xmlns:wcm="http://schemas.microsoft.com/WMIConfig/2002/State" xmlns:xsi="http://www.w3.org/2001/XMLSchema-instance">
            <SetupUILanguage>
                <UILanguage>en-US</UILanguage>
            </SetupUILanguage>
            <UserLocale>en-US</UserLocale>
            <SystemLocale>en-US</SystemLocale>
            <InputLocale>en-US</InputLocale>
            <UILanguage>en-US</UILanguage>
        </component>
    </settings>
    <settings pass="specialize">
        <component name="Microsoft-Windows-Shell-Setup" processorArchitecture="amd64" publicKeyToken="31bf3856ad364e35" language="neutral" versionScope="nonSxS" xmlns:wcm="http://schemas.microsoft.com/WMIConfig/2002/State" xmlns:xsi="http://www.w3.org/2001/XMLSchema-instance">
            <ComputerName>WR-001</ComputerName>
        </component>
    </settings>
    <settings pass="oobeSystem">
        <component name="Microsoft-Windows-Shell-Setup" processorArchitecture="amd64" publicKeyToken="31bf3856ad364e35" language="neutral" versionScope="nonSxS" xmlns:wcm="http://schemas.microsoft.com/WMIConfig/2002/State" xmlns:xsi="http://www.w3.org/2001/XMLSchema-instance">
            <AutoLogon>
                <Username>Administrator</Username>
                <LogonCount>3</LogonCount>
                <Enabled>true</Enabled>
                <Password>
                    <Value>eABPACQAcQBDAF4AKgBTAFAAYQBzAHMAdwBvAHIAZAA=</Value>
                    <PlainText>false</PlainText>
                </Password>
            </AutoLogon>
            <OOBE>
                <ProtectYourPC>3</ProtectYourPC>
                <HideWirelessSetupInOOBE>true</HideWirelessSetupInOOBE>
            </OOBE>
            <TaskbarLinks>
                <Link0>%USERPROFILE%\AppData\Roaming\Microsoft\Windows\Start Menu\Programs\Accessories\Internet Explorer.lnk</Link0>
            </TaskbarLinks>
            <UserAccounts>
                <AdministratorPassword>
                    <Value>UABhAHMAcwB3AG8AcgBkADAAMQAhAEEAZABtAGkAbgBpAHMAdAByAGEAdABvAHIAUABhAHMAcwB3AG8AcgBkAA==</Value>
                    <PlainText>false</PlainText>
                </AdministratorPassword>
                <LocalAccounts>
                    <LocalAccount wcm:action="add">
                        <Password>
                            <Value>UABhAHMAcwB3AG8AcgBkADAAMQAhAFAAYQBzAHMAdwBvAHIAZAA=</Value>
                            <PlainText>false</PlainText>
                        </Password>
                        <Name>Support</Name>
                        <Group>Administrators</Group>
                    </LocalAccount>
                </LocalAccounts>
            </UserAccounts>
        </component>
        <component name="Microsoft-Windows-International-Core" processorArchitecture="amd64" publicKeyToken="31bf3856ad364e35" language="neutral" versionScope="nonSxS" xmlns:wcm="http://schemas.microsoft.com/WMIConfig/2002/State" xmlns:xsi="http://www.w3.org/2001/XMLSchema-instance">
            <InputLocale>en-US</InputLocale>
            <SystemLocale>en-US</SystemLocale>
            <UserLocale>en-US</UserLocale>
            <UILanguage>en-US</UILanguage>
        </component>
    </settings>
    <cpi:offlineImage cpi:source="wim:w:/cccoma_x64fre_en-us_dv9/sources/install.wim#Windows 10 Pro" xmlns:cpi="urn:schemas-microsoft-com:cpi" />
</unattend>
AutoUnattend.xml – UEFI – Windows 10 – 1803:
<?xml version="1.0" encoding="utf-8"?>
<unattend xmlns="urn:schemas-microsoft-com:unattend">
    <settings pass="windowsPE">
        <component name="Microsoft-Windows-Setup" processorArchitecture="amd64" publicKeyToken="31bf3856ad364e35" language="neutral" versionScope="nonSxS" xmlns:wcm="http://schemas.microsoft.com/WMIConfig/2002/State" xmlns:xsi="http://www.w3.org/2001/XMLSchema-instance">
            <DiskConfiguration>
                <Disk wcm:action="add">
                    <CreatePartitions>
                        <CreatePartition wcm:action="add">
                            <Type>EFI</Type>
                            <Size>512</Size>
                            <Order>1</Order>
                        </CreatePartition>
                        <CreatePartition wcm:action="add">
                            <Extend>false</Extend>
                            <Type>MSR</Type>
                            <Order>2</Order>
                            <Size>128</Size>
                        </CreatePartition>
                        <CreatePartition wcm:action="add">
                            <Type>Primary</Type>
                            <Order>3</Order>
                            <Size>1024</Size>
                        </CreatePartition>
                        <CreatePartition wcm:action="add">
                            <Order>4</Order>
                            <Type>Primary</Type>
                            <Extend>true</Extend>
                        </CreatePartition>
                    </CreatePartitions>
                    <ModifyPartitions>
                        <ModifyPartition wcm:action="add">
                            <Format>FAT32</Format>
                            <Order>1</Order>
                            <PartitionID>1</PartitionID>
                        </ModifyPartition>
                        <ModifyPartition wcm:action="add">
                            <Order>2</Order>
                            <PartitionID>2</PartitionID>
                        </ModifyPartition>
                        <ModifyPartition wcm:action="add">
                            <Format>NTFS</Format>
                            <Order>3</Order>
                            <PartitionID>3</PartitionID>
                            <Label>Recovery</Label>
                            <TypeID>DE94BBA4-06D1-4D40-A16A-BFD50179D6AC</TypeID>
                        </ModifyPartition>
                        <ModifyPartition wcm:action="add">
                            <Format>NTFS</Format>
                            <Label>Windows</Label>
                            <Order>4</Order>
                            <PartitionID>4</PartitionID>
                        </ModifyPartition>
                    </ModifyPartitions>
                    <DiskID>0</DiskID>
                    <WillWipeDisk>true</WillWipeDisk>
                </Disk>
                <WillShowUI>OnError</WillShowUI>
            </DiskConfiguration>
            <ImageInstall>
                <OSImage>
                    <InstallFrom>
                        <MetaData wcm:action="add">
                            <Key>/IMAGE/NAME</Key>
                            <Value>Windows 10 Pro</Value>
                        </MetaData>
                    </InstallFrom>
                    <InstallTo>
                        <DiskID>0</DiskID>
                        <PartitionID>4</PartitionID>
                    </InstallTo>
                    <WillShowUI>OnError</WillShowUI>
                    <InstallToAvailablePartition>false</InstallToAvailablePartition>
                </OSImage>
            </ImageInstall>
            <UserData>
                <ProductKey>
                    <WillShowUI>OnError</WillShowUI>
                    <Key>VK7JG-NPHTM-C97JM-9MPGT-3V66T</Key>
                </ProductKey>
                <AcceptEula>true</AcceptEula>
            </UserData>
        </component>
        <component name="Microsoft-Windows-International-Core-WinPE" processorArchitecture="amd64" publicKeyToken="31bf3856ad364e35" language="neutral" versionScope="nonSxS" xmlns:wcm="http://schemas.microsoft.com/WMIConfig/2002/State" xmlns:xsi="http://www.w3.org/2001/XMLSchema-instance">
            <SetupUILanguage>
                <UILanguage>en-US</UILanguage>
            </SetupUILanguage>
            <UserLocale>en-US</UserLocale>
            <SystemLocale>en-US</SystemLocale>
            <InputLocale>en-US</InputLocale>
            <UILanguage>en-US</UILanguage>
        </component>
    </settings>
    <settings pass="specialize">
        <component name="Microsoft-Windows-Shell-Setup" processorArchitecture="amd64" publicKeyToken="31bf3856ad364e35" language="neutral" versionScope="nonSxS" xmlns:wcm="http://schemas.microsoft.com/WMIConfig/2002/State" xmlns:xsi="http://www.w3.org/2001/XMLSchema-instance">
            <ComputerName>WR-001</ComputerName>
        </component>
    </settings>
    <settings pass="oobeSystem">
        <component name="Microsoft-Windows-Shell-Setup" processorArchitecture="amd64" publicKeyToken="31bf3856ad364e35" language="neutral" versionScope="nonSxS" xmlns:wcm="http://schemas.microsoft.com/WMIConfig/2002/State" xmlns:xsi="http://www.w3.org/2001/XMLSchema-instance">
            <AutoLogon>
                <Username>Administrator</Username>
                <LogonCount>3</LogonCount>
                <Enabled>true</Enabled>
                <Password>
                    <Value>eABPACQAcQBDAF4AKgBTAFAAYQBzAHMAdwBvAHIAZAA=</Value>
                    <PlainText>false</PlainText>
                </Password>
            </AutoLogon>
            <OOBE>
                <ProtectYourPC>3</ProtectYourPC>
                <HideWirelessSetupInOOBE>true</HideWirelessSetupInOOBE>
            </OOBE>
            <TaskbarLinks>
                <Link0>%USERPROFILE%\AppData\Roaming\Microsoft\Windows\Start Menu\Programs\Accessories\Internet Explorer.lnk</Link0>
            </TaskbarLinks>
            <UserAccounts>
                <AdministratorPassword>
                    <Value>UABhAHMAcwB3AG8AcgBkADAAMQAhAEEAZABtAGkAbgBpAHMAdAByAGEAdABvAHIAUABhAHMAcwB3AG8AcgBkAA==</Value>
                    <PlainText>false</PlainText>
                </AdministratorPassword>
                <LocalAccounts>
                    <LocalAccount wcm:action="add">
                        <Password>
                            <Value>UABhAHMAcwB3AG8AcgBkADAAMQAhAFAAYQBzAHMAdwBvAHIAZAA=</Value>
                            <PlainText>false</PlainText>
                        </Password>
                        <Group>Administrators</Group>
                        <Name>Support</Name>
                    </LocalAccount>
                </LocalAccounts>
            </UserAccounts>
        </component>
        <component name="Microsoft-Windows-International-Core" processorArchitecture="amd64" publicKeyToken="31bf3856ad364e35" language="neutral" versionScope="nonSxS" xmlns:wcm="http://schemas.microsoft.com/WMIConfig/2002/State" xmlns:xsi="http://www.w3.org/2001/XMLSchema-instance">
            <InputLocale>en-US</InputLocale>
            <SystemLocale>en-US</SystemLocale>
            <UILanguage>en-US</UILanguage>
            <UserLocale>en-US</UserLocale>
        </component>
    </settings>
    <cpi:offlineImage cpi:source="wim:w:/cccoma_x64fre_en-us_dv9/sources/install.wim#Windows 10 Pro" xmlns:cpi="urn:schemas-microsoft-com:cpi" />
</unattend>
MODIFY THE BOOT.WIM
Now, you’re going to want to take which ever “AutoUnattend.xml” file you need, whether for a BIOS or UEFI system and place it right next to Windows Setup in the boot image which is the boot.wim, similar to path below:
W:\CCCOMA_X64FRE_EN-US_DV9\sources\boot.wim\2\AutoUnattend.xml
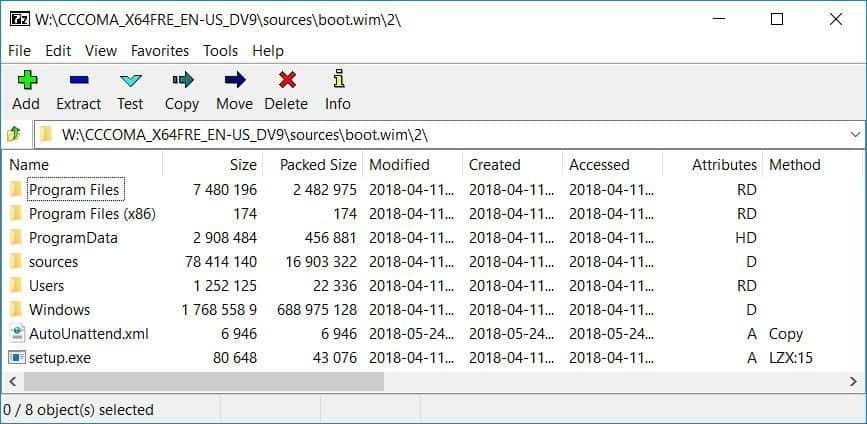
By placing it here, the XML file will be loaded into memory, making it instant and easy for Windows Setup to find and we do not need an external drive with the file placed on it. For this, I simply use a program called 7-Zip. Right-click the boot.wim, hover over 7-Zip and select “Open archive” and copy the “AutoUnattend.xml” into the directory I specified above.
If you do not want to use 7-Zip you can mount the boot.wim with DISM commands in Command Prompt and then commit changes when done.
Please review: Modify a Windows Image Using DISM
With the information in the above link, here are commands that I use:
Dism /Get-ImageInfo /imagefile:"W:\CCCOMA_X64FRE_EN-US_DV9\Source\sources\boot.wim"The command above will give you the image index information:
Dism /Mount-Image /ImageFile:"W:\CCCOMA_X64FRE_EN-US_DV9\Source\sources\boot.wim" /Index:2 /MountDir:"W:\CCCOMA_X64FRE_EN-US_DV9\Mount"Now we mount the files and they will be placed into the “Mount” folder so we can edit them or place files into the image:
Dism /Unmount-Image /MountDir:"W:\CCCOMA_X64FRE_EN-US_DV9\Mount" /CommitThen we commit the changes and the boot.wim is edited.
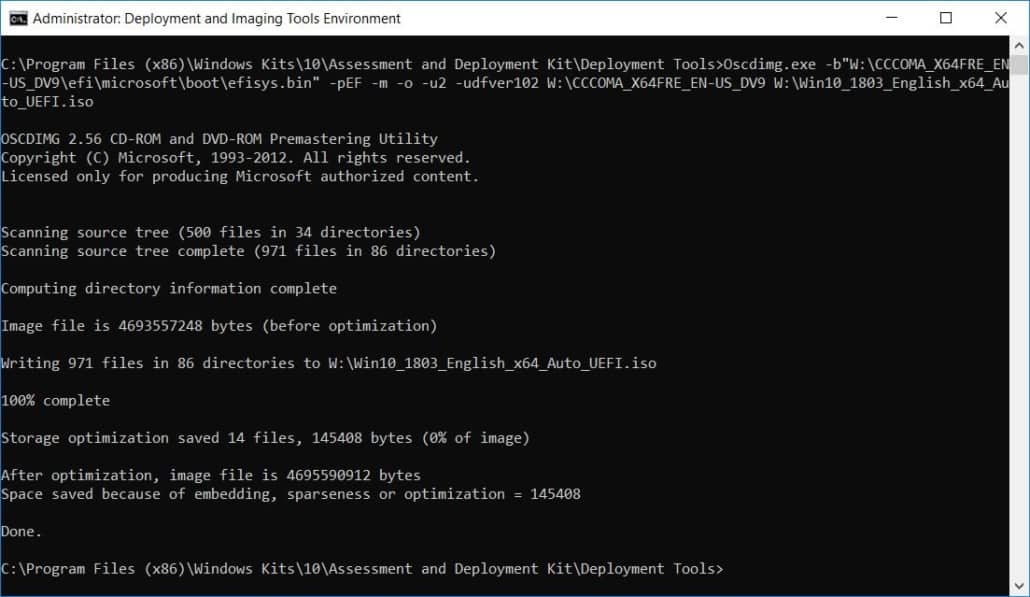
CREATE AN ISO WITH OSCDIMG.EXE
Now, if you wrote your ISO to a USB drive, you can simply modify the contents of it, but if you would like to create an ISO we can use “Oscdimg.exe”. I have also went ahead and given the commands for these. You’re welcome. Install “Windows Kits\10\ADK\Installers\Windows Deployment Tools-x86_en-us.msi”. Then open “Deployment and Imaging Tools Environment” from the Start Menu.
OSCDIMG.EXE – BIOS
Oscdimg.exe -bW:\CCCOMA_X64FRE_EN-US_DV9\boot\etfsboot.com -p00 -m -o -u2 -udfver102 W:\CCCOMA_X64FRE_EN-US_DV9 W:\Win10_1803_English_x64_Auto_BIOS.isoOSCDIMG.EXE – UEFI
Oscdimg.exe -b”W:\CCCOMA_X64FRE_EN-US_DV9\efi\microsoft\boot\efisys.bin” -pEF -m -o -u2 -udfver102 W:\CCCOMA_X64FRE_EN-US_DV9 W:\Win10_1803_English_x64_Auto_UEFI.isoOSCDIMG.EXE – BIOS OR UEFI
Oscdimg.exe -m -o -u2 -udfver102 -bootdata:2#p0,e,b”W:\CCCOMA_X64FRE_EN-US_DV9\boot\etfsboot.com”#pEF,e,b”W:\CCCOMA_X64FRE_EN-US_DV9\efi\microsoft\boot\efisys.bin” W:\CCCOMA_XYou will need to modify the paths with yours first. Then paste them in the Command Prompt Window and watch the magic happen. The last command will actually make the ISO work for either BIOS or UEFI systems, but because our “AutoUnattend.xml” is set for one or the other, that kind of defeats the purpose, but it’s provided if you don’t want to use partitioning in the “AutoUnattend.xml” answer file.
When booted, there will be no prompts for you to click, it should just go all the way through and login for you into the Built-in Local Administrator user account. You will see I have “Administrator” to login automatically 3 times.
I have also modified the computer name. Yes, Microsoft thought it would be a great service to its customers to remove the ability for Windows Setup to ask for the Computer Name during setup. The only way now to preset it to something you want without having to change it later is in an Answer File, and these “AutoUnattend.xml” files have it and you will see the name is “WR-001”.
I have also added another Administrator user account called “WinReflection”, and a standard Non-Administrator user called “Operator”.
I even added a Taskbar Link for Internet Explorer 11. The rest just has to do with automating the install.
CONCLUSION
Well, there you go! I thought this was a cool project that I spent time to understand and test. Hopefully it helps someone out there. I am sure you had a bundle of fun following along. WSIM is also used to create Answer Files for Sysprep and I will be working on that next. Well, it’s actually already done I just need to post it.
Hey folks, my name is Dex and you’ve landed on my website. Ponder this; was it by coincidence or did God bring you here? Either way, I hope you find something of value. We may not agree on everything, but that’s just part of the fun here!
It’s my hope here that you also become inspired to join the good fight against evil. There are no ads here, just truth bombs. So change your tune because the best is yet to come, and nothing can stop what’s coming!
John 3:16: For God so loved the world that he gave his one and only Son, that whoever believes in him shall not perish but have eternal life.
Leave a Reply
Want to join the discussion?Feel free to contribute!