 flaticon.com
Block Pornography and Ads Easy with Pi-Hole
Table of Contents
INTRO
We can block pornography and ads in our home network with some work. During the Christian Walk the enemy uses many tactics to bring us out of the Will of God and tempt us to sin. The world is full of temptations and visual triggers. Pornography is a very damaging and disgusting industry.
There are some things out there that can aid us in blocking it out of our lives which this post aims to cover. I am sharing with the thought that others could use this information, such as parents that wish to protect their children. While you can’t guard them 24/7, you can at least block it in your own home.
WHAT IS DD-WRT?
DD-WRT is open-source third-party firmware. DD-WRT offers a way for users to upgrade their home’s networking equipment such as their wireless router which will allow them to use features that are not available with the stock official firmware.
It’s not necessary for this guide but it will be helpful in blocking the circumvention of what we are trying to accomplish, this will be explained more later on. Since DD-WRT is available on many makes and models of routers that most people will have in their house I felt it was a great point to make in this post. You will need to research on how to flash your particular router which this guide will not cover.
WHAT IS A RASPBERRY PI AND PI-HOLE?
A Raspberry Pi is small IoT device that is essentially a full computer on a little PCB, with its own CPU, RAM and storage that we can utilize to run various operating systems. In this guide we will be using one to run something called Pi-Hole on a Raspberry Pi model 3B.
Pi-hole is a Linux network-level advertisement and Internet tracker blocking application which acts as a DNS sinkhole, intended for use on a private network.
What Pi-Hole will allow us to do is take the place of your ISP’s DNS servers provided to you. This is a service that translates domain names and hostnames to IP addresses. It would be too difficult for people to remember individual IP addresses, so we have domain names. For example, a WHOIS IP Lookup for google.com translates to 172.217.10.238. If you put that IP in your browser’s search bar it will bring you to Google’s search engine.
When you type google.com into your browser’s search bar, that request is sent to the DNS servers set in your router, usually dynamically set by what’s provided by the modem which your ISP provides. In most routers you can override the DNS servers provided by the modem/ISP.
The Raspberry Pi running Pi-Hole will become a DNS server of sorts containing blocklists of many domain names of various categories that we can choose from, and a request to a domain on a blocklist will be returned back to the sender as unreachable. In other words, the request never made it out to the ISP, it was blocked.
INSTALLING RASPBERRY PI OS LITE
UPDATE:
As per revision notes as of build 2022-04-04:
* Default “pi” user has been removed; the first-boot wizard enforces the creation of a new user account.
- Use the Raspberry Pi Imager instead of balenaEtcher going forward to create a default boot user or password and adjust other settings. Also, a 64-bit version of Raspberry Pi OS Lite is now recommended instead.
Let’s start with getting Pi-Hole installed on your Raspberry Pi device. I am using the kit sold here. This kit is nice because I can have a screen output directly on the device but this is not needed and complicates the install. I installed one for my parents not long ago and went with this kit.
Head over here and download the latest version of Raspberry Pi OS Lite , the ZIP package, to a location you will remember. Then we’re going to download the portable version of balenaEtcher here. This will allow us to write the Raspberry Pi OS Lite image to your SD-CARD that will be used in the Raspberry Pi. Once you have done that, we’re going to make some changes that I recommend.
- Create a file called “ssh” on the SD-CARD from within your File Explorer, you will need make sure you have “File name extensions” checked, this is located under the “View” toolbar in File Explorer on Windows 10. Delete .txt at the end of ssh.txt so that it’s just a blank file. This will allow you to remotely manage the Pi from a computer over your network.
- Next we’re going to make some modifications to the config.txt file to disable the on-board Wi-Fi and Bluetooth. We won’t be using these so it’s best to disable them. Place the following at the end of your config.txt file.
# Disable Wi-Fi and Bluetooth
dtoverlay=pi3-disable-wifi
dtoverlay=pi3-disable-bt
GATHERING DHCP INFORMATION
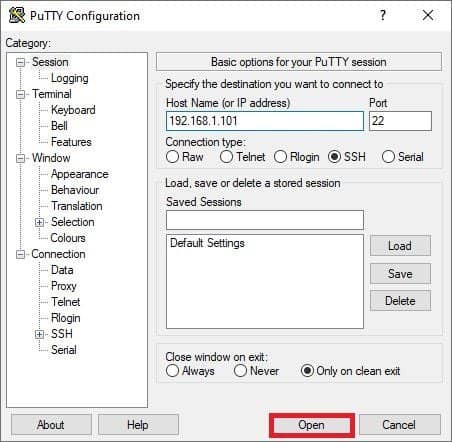
Now you can do this via Putty or manually with a monitor and keyboard. I will be using Putty, you can download here.
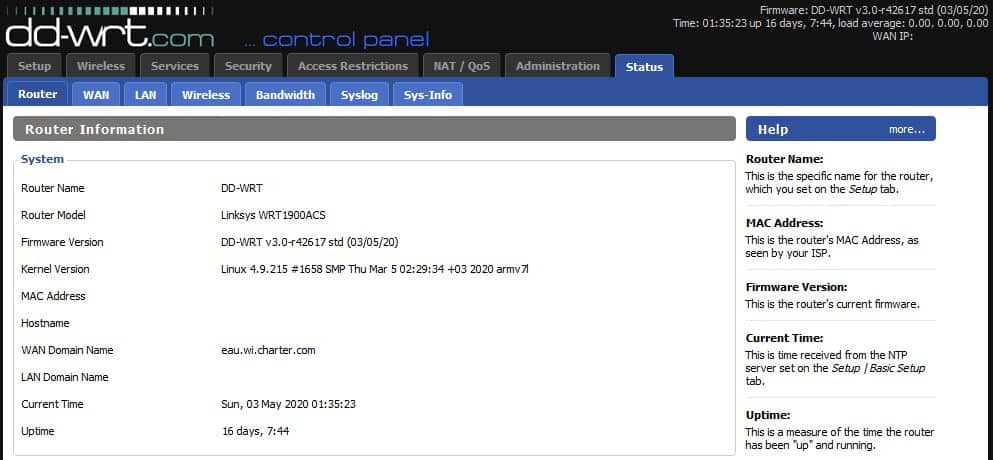
Connect your Raspberry Pi to your router with an Ethernet cable, your router should give it an IP address automatically with DHCP like any other device on your network. However, we are first going to need to login to the web console of your router. For example, with DD-WRT mine is 192.168.1.1, the router’s IP address. From your router’s web console, you will need to login and view the connected clients and see what IP is given to your Raspberry Pi device.
While we’re in there we want to figure out what the DHCP range is set in the router because we’re going to need to set a static IP address for the Pi, we could do a DHCP reservation but I do not prefer that. We want to configure Pi-Hole outside the range of DHCP so we don’t end up with two devices having a duplicate IP address on your network. Look at my DHCP configuration below:
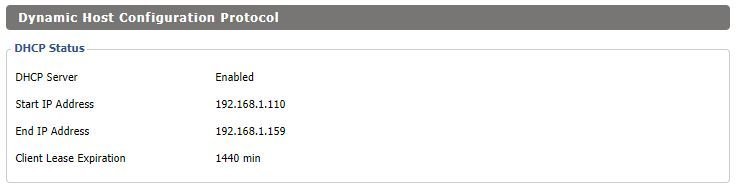
In DD-WRT > Status > LAN you will see the above. I have my Pi’s IP set to 192.168.1.101, set as Static DNS 1 in DD-WRT so that all DNS requests go to it. The 192.168.1.101 IP address will not be given out by DHCP as the Start IP Address is 192.168.1.110. You will need to configure your setup in a similar fashion. Gather this information now but don’t make changes. You can change DHCP configuration under DD-WRT > Setup > Network Setup.
CONNECTING WITH PUTTY AND SSH
Now let’s connect to the Pi remotely with Putty.
Now select Open and you should see the following:
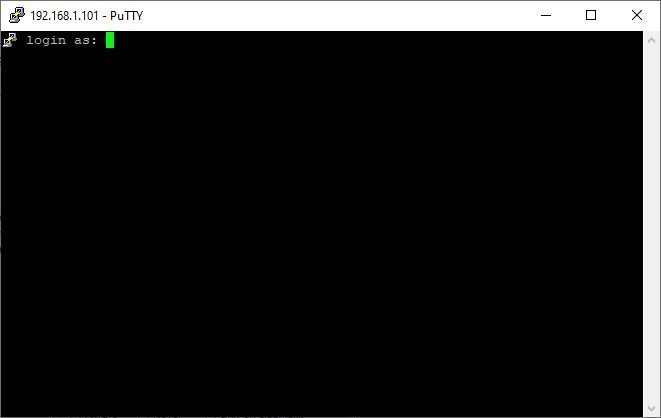
The default username for Pi-Hole is: pi
The default password for the pi login is: raspberry
Once logged in, an important note to make here is that we should change the pi user’s password, we can do that with the command:
sudo raspi-configThe Raspberry Pi Software Configuration Tool (raspi-config) window will appear.
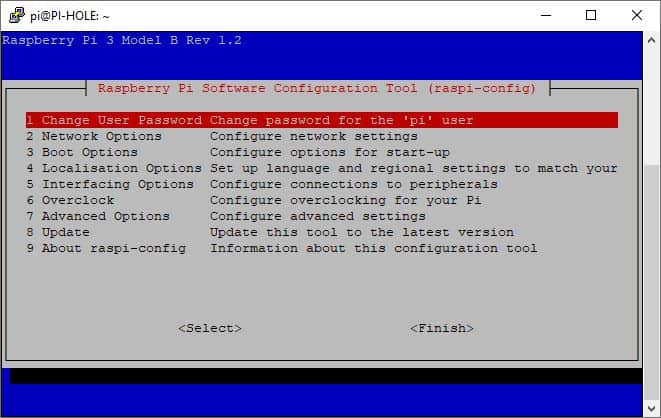
- Run Option 1 – Change User Password to “Change password for the “pi” user“.
From this same Window we also want to set the time correctly.
- Run Option 4 – Localization Options > I2 Change Timezone > Select “US” > Then (for me) I select “Central“.
Next, run the following to change the hostname. I set mine to “PI-HOLE”. You will need to type it and then do Crtl + X , type “Y”, and then press enter to overwrite the file with the same name in order to save changes.
sudo nano /etc/hostnameNext, run the following to also make the change in the hosts file, the name next to 127.0.0.1, the Loopback IP. There is an image further down of this.
sudo nano /etc/hostsUPDATING THE RASPBERRY PI OS & FIRMWARE
sudo apt update && sudo apt upgrade
sudo apt install rpi-eeprom rpi-eeprom-images
sudo rpi-eeprom-update
INSTALLING AND CONFIGURING PI-HOLE
Next, run the following to start the install of Pi-Hole.
curl -sSL https://install.pi-hole.net | bash- Once the initial installation is done, go through the following Windows:
- Pi-hole automated installer: This installer will transform your device into a network-wide as blocker!
- Select “OK”.
- Free and open source: The Pi-hole is free, but powered by your donations: http://pi-hole.net/donate
- Select “OK”.
- Static IP Needed: The Pi-hole is a SERVER so it needs a STATIC IP ADDRESS to function properly. In the next section, you can choose to use your current network settings (DHCP) or to manually edit them.
- Select “OK”.
- Select Upstream DNS Provider. To use your own, select Custom.
- Highlight “OpenDNS (ECS)”, press “Tab” select”OK”.
- Pi-hole relies on thirdsparty lists in order to block ads. You can use suggestions below, and/pr add your own after installation. To deselect any list, use the arrow keys and spacebar.
- Select every list then select “OK”.
- Select Protocols (press space to select)
- Select “IPv4 – Block ads over IPv4” and “IPv6 – Block ads over IPv6”, select “OK”.
- Static IP Address: Do you want to use your current network settings as a static address? IP address: X.X.X.X/24, Gateway: X.X.X.X
- Select “No” and input an IP address that will be outside of your router’s DHCP range like talked about earlier.
- Do you wish to install the web server (lighttpd)? NB: If you disable this, and, do not have an existing webserver installed, the web interface will not function.
- Select “On (Recommended)”, select “OK”
- Do you want to log queries?
- Select “On (Recommended)”, select “OK”
- Select a privacy mode for FTL. https://dics.pi-hole.net/ftldns/privacylevels/
- Select “0 – Show everything”, select “OK”
- Installation Complete! Configure your devices to use the Pi-hole as their DNS server using: IPv4: X.X.X.X, IPv6: Not Configured. If you set a new IP address, you should restart the Pi. The install log is in /etc/pihole. View the web interface at http://pi.hole/admin or http://X.X.X.X/admin. Your Admin Webpage login password is: XXXXXXXX
- Record the password given on this windows, select “OK”.
- Pi-hole automated installer: This installer will transform your device into a network-wide as blocker!
- Once it’s done, copy the Admin Webpage login password from the Installation Complete screen.
FORCING SAFE SEARCH
While we can block a lot of pornography using this, a user could simply go onto Google and search that sort of content with the image search. Google and other search engines have a Safe Search feature that can block this, but it’s not forced or on by default.
We need a way to force this setting, there are some DNS servers out there that do it for you such as CleanBrowsing DNS, but we can have Pi-Hole accomplish this natively as well so we can use any DNS servers we want.
Run the command below:
sudo nano /etc/dnsmasq.d/05-restrict.conf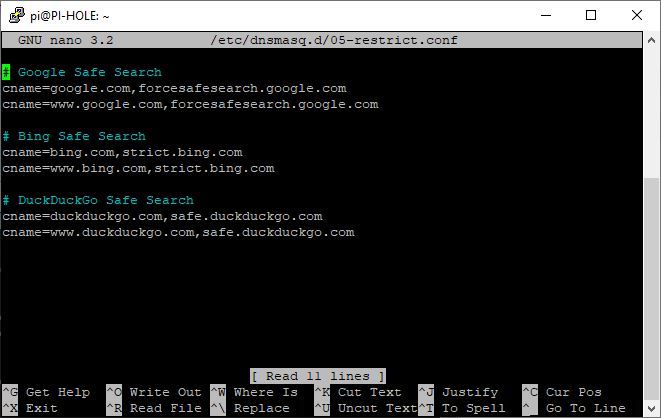
Copy and paste the contents below into the file. Here is a link also worth reading to understand this more, also this link.
# Google Safe Search
cname=google.com,forcesafesearch.google.com
cname=www.google.com,forcesafesearch.google.com

# Bing Safe Search
cname=bing.com,strict.bing.com
cname=www.bing.com,strict.bing.com

# DuckDuckGo Safe Search
cname=duckduckgo.com,safe.duckduckgo.com
cname=www.duckduckgo.com,safe.duckduckgo.com
You can also restrict YouTube as well, like blocking the comment sections of videos. We all know how vulgar those can be. I myself do not use this.
# YouTube Restricted
# You can also implement a moderate setting instead. Replace restrict.youtube.com with restrictmoderate.youtube.com
cname=youtube.com,restrictmoderate.youtube.com
cname=www.youtube.com,restrictmoderate.youtube.com
cname=m.youtube.com,restrictmoderate.youtube.com
cname=youtubei.googleapis.com,restrictmoderate.youtube.com
cname=youtube.googleapis.com,restrictmoderate.youtube.com
cname=youtube-nocookie.com,restrictmoderate.youtube.com
cname=www.youtube-nocookie.com,restrictmoderate.youtube.com
Now run this command:
sudo nano /etc/hosts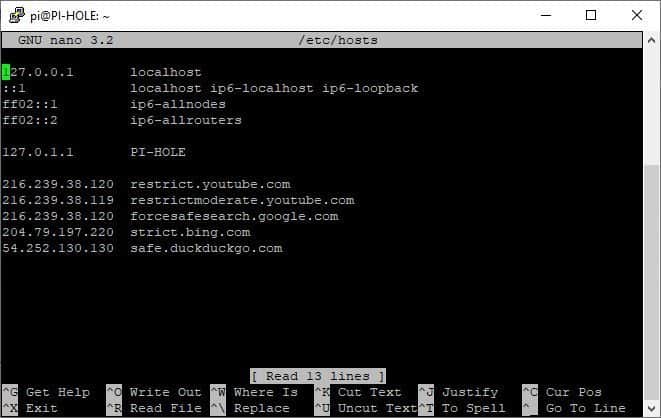
216.239.38.120  restrict.youtube.com
216.239.38.119  restrictmoderate.youtube.com
216.239.38.120  forcesafesearch.google.com
204.79.197.220  strict.bing.com
40.89.244.237   safe.duckduckgo.com
PREVENTING CIRCUMVENTION
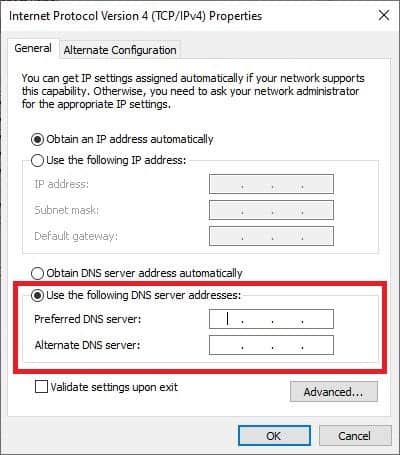
So now that we have everything set what about users trying to get around this? Well users could get around this as client devices have the ability to set custom DNS servers on the network adapter, see below:
So, we need a way to prevent clients from using port 53 with different DNS servers. Through some research and testing I found a way to do this with DD-WRT. Originally, I wanted to redirect traffic from other DNS servers to the Pi-Hole, but this appears to be a limitation in DD-WRT unless you configure some VLANs.
Instead with the following below, clients that input different DNS servers will simply be unable to use DNS on port 53, meaning no access to the internet. This should make for some good fun in a house with some tech savvy users that know how to change the above settings. Just replace 192.168.1.101 in my commands below with the IP address of your Pi.
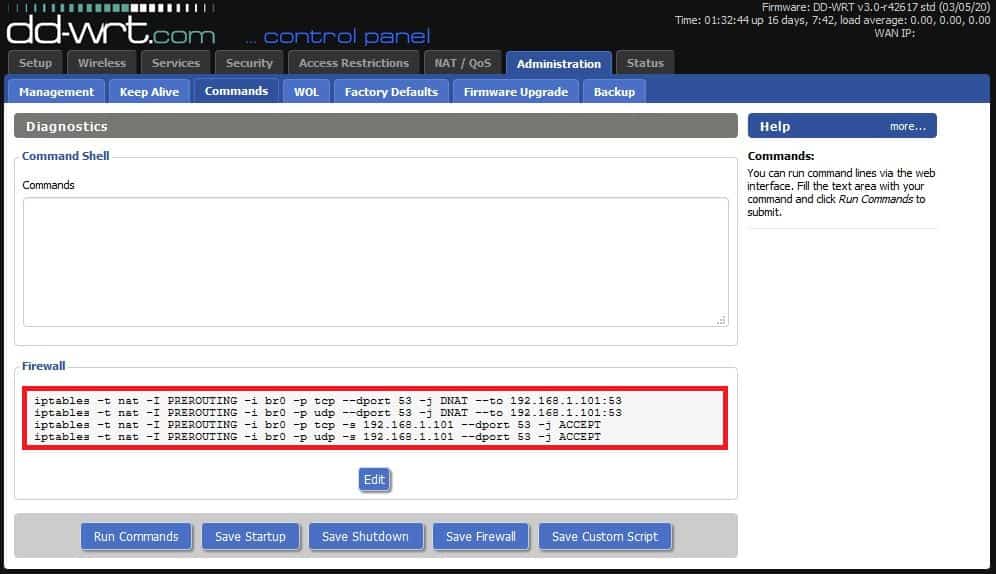
iptables -t nat -I PREROUTING -i br0 -p tcp --dport 53 -j DNAT --to 192.168.1.101:53
iptables -t nat -I PREROUTING -i br0 -p udp --dport 53 -j DNAT --to 192.168.1.101:53
iptables -t nat -I PREROUTING -i br0 -p tcp -s 192.168.1.101 --dport 53 -j ACCEPT
iptables -t nat -I PREROUTING -i br0 -p udp -s 192.168.1.101 --dport 53 -j ACCEPT
BLOCKLISTS
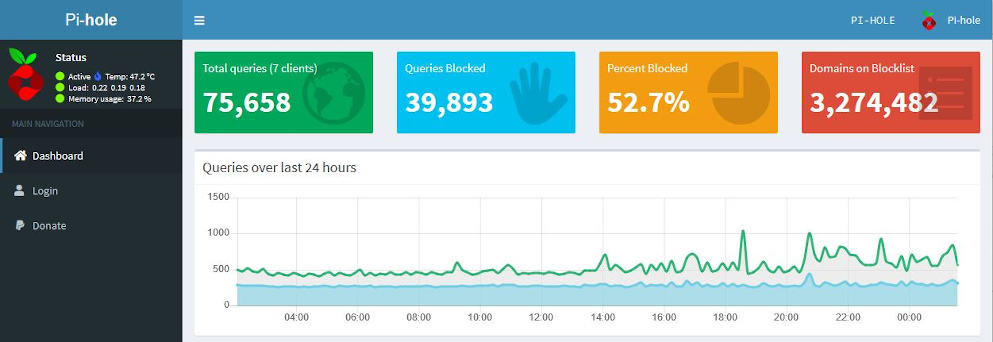
Now we’re going to make Pi-Hole more effective. Login to the Web Admin console for Pi-Hole, mine is at http://192.168.1.101/admin. Select “Login” then input the password you recorded earlier. Navigate to Settings > Blocklists, I am using managed blocklists from the Block List Project, the default lists, and others that I found. You should be able to copy all of the lines below and paste on the line where to enter your lists and should take them all at once.
After you enter the ones you want, click “Save and Update”. This part could take a while, I have over 4.5 million domains on my Block List.
https://raw.githubusercontent.com/StevenBlack/hosts/master/hosts
https://mirror1.malwaredomains.com/files/justdomains
http://sysctl.org/cameleon/hosts
https://s3.amazonaws.com/lists.disconnect.me/simple_tracking.txt
https://s3.amazonaws.com/lists.disconnect.me/simple_ad.txt
https://hosts-file.net/ad_servers.txt
https://adaway.org/hosts.txt
https://v.firebog.net/hosts/AdguardDNS.txt
https://v.firebog.net/hosts/Admiral.txt
https://raw.githubusercontent.com/anudeepND/blacklist/master/adservers.txt
https://v.firebog.net/hosts/Easylist.txt
https://pgl.yoyo.org/adservers/serverlist.php?hostformat=hosts&showintro=0&mimetype=plaintext
https://raw.githubusercontent.com/FadeMind/hosts.extras/master/UncheckyAds/hosts
https://raw.githubusercontent.com/bigdargon/hostsVN/master/hosts
https://raw.githubusercontent.com/jdlingyu/ad-wars/master/hosts
https://v.firebog.net/hosts/Easyprivacy.txt
https://v.firebog.net/hosts/Prigent-Ads.txt
https://gitlab.com/quidsup/notrack-blocklists/raw/master/notrack-blocklist.txt
https://raw.githubusercontent.com/FadeMind/hosts.extras/master/add.2o7Net/hosts
https://raw.githubusercontent.com/crazy-max/WindowsSpyBlocker/master/data/hosts/spy.txt
https://hostfiles.frogeye.fr/firstparty-trackers-hosts.txt
https://hostfiles.frogeye.fr/multiparty-trackers-hosts.txt
https://www.github.developerdan.com/hosts/lists/ads-and-tracking-extended.txt
https://raw.githubusercontent.com/Perflyst/PiHoleBlocklist/master/android-tracking.txt
https://raw.githubusercontent.com/Perflyst/PiHoleBlocklist/master/SmartTV.txt
https://raw.githubusercontent.com/Perflyst/PiHoleBlocklist/master/AmazonFireTV.txt
https://raw.githubusercontent.com/DandelionSprout/adfilt/master/Alternate%20versions%20Anti-Malware%20List/AntiMalwareHosts.txt
https://osint.digitalside.it/Threat-Intel/lists/latestdomains.txt
https://s3.amazonaws.com/lists.disconnect.me/simple_malvertising.txt
https://v.firebog.net/hosts/Prigent-Crypto.txt
https://mirror.cedia.org.ec/malwaredomains/immortal_domains.txt
https://www.malwaredomainlist.com/hostslist/hosts.txt
https://bitbucket.org/ethanr/dns-blacklists/raw/8575c9f96e5b4a1308f2f12394abd86d0927a4a0/bad_lists/Mandiant_APT1_Report_Appendix_D.txt
https://phishing.army/download/phishing_army_blocklist_extended.txt
https://gitlab.com/quidsup/notrack-blocklists/raw/master/notrack-malware.txt
https://v.firebog.net/hosts/Shalla-mal.txt
https://raw.githubusercontent.com/Spam404/lists/master/main-blacklist.txt
https://raw.githubusercontent.com/FadeMind/hosts.extras/master/add.Risk/hosts
https://urlhaus.abuse.ch/downloads/hostfile/
https://v.firebog.net/hosts/Prigent-Malware.txt
https://raw.githubusercontent.com/HorusTeknoloji/TR-PhishingList/master/url-lists.txt
https://zerodot1.gitlab.io/CoinBlockerLists/hosts_browser
https://raw.githubusercontent.com/chadmayfield/my-pihole-blocklists/master/lists/pi_blocklist_porn_all.list
https://raw.githubusercontent.com/chadmayfield/my-pihole-blocklists/master/lists/pi_blocklist_porn_top1m.list
https://raw.githubusercontent.com/PolishFiltersTeam/KADhosts/master/KADhosts_without_controversies.txt
https://raw.githubusercontent.com/FadeMind/hosts.extras/master/add.Spam/hosts
https://v.firebog.net/hosts/static/w3kbl.txt
https://raw.githubusercontent.com/matomo-org/referrer-spam-blacklist/master/spammers.txt
https://someonewhocares.org/hosts/zero/hosts
https://raw.githubusercontent.com/vokins/yhosts/master/hosts
https://winhelp2002.mvps.org/hosts.txt
https://hosts.nfz.moe/basic/hosts
https://raw.githubusercontent.com/RooneyMcNibNug/pihole-stuff/master/SNAFU.txt
https://ssl.bblck.me/blacklists/hosts-file.txt
https://blocklist.site/app/dl/ads
https://blocklist.site/app/dl/drugs
https://blocklist.site/app/dl/fraud
https://blocklist.site/app/dl/gambling
https://blocklist.site/app/dl/malware
https://blocklist.site/app/dl/phishing
https://blocklist.site/app/dl/piracy
https://blocklist.site/app/dl/porn
https://blocklist.site/app/dl/proxy
https://blocklist.site/app/dl/ransomware
https://blocklist.site/app/dl/redirect
https://blocklist.site/app/dl/scam
https://blocklist.site/app/dl/spam
https://blocklist.site/app/dl/torrent
https://blocklist.site/app/dl/tracking
https://raw.githubusercontent.com/PolishFiltersTeam/KADhosts/master/KADhosts.txt
https://raw.githubusercontent.com/VeleSila/yhosts/master/hosts
https://v.firebog.net/hosts/neohostsbasic.txt
https://paulgb.github.io/BarbBlock/blacklists/hosts-file.txt
https://hostsfile.mine.nu/hosts0.txt
https://v.firebog.net/hosts/BillStearns.txt
https://hostsfile.org/Downloads/hosts.txt
https://www.joewein.net/dl/bl/dom-bl-base.txt
https://v.firebog.net/hosts/Kowabit.txt
https://adblock.mahakala.is
https://raw.githubusercontent.com/Kees1958/W3C_annual_most_used_survey_blocklist/master/TOP_EU_US_Ads_Trackers_HOST
https://v.firebog.net/hosts/Airelle-trc.txt
https://v.firebog.net/hosts/Airelle-hrsk.txt
https://raw.githubusercontent.com/tg12/pihole-phishtank-list/master/list/phish_domains.txt
https://github.com/Ewpratten/youtube_ad_blocklist/blob/master/blocklist.txt
https://gist.githubusercontent.com/anudeepND/adac7982307fec6ee23605e281a57f1a/raw/5b8582b906a9497624c3f3187a49ebc23a9cf2fb/Test.txt
https://blocklistproject.github.io/Lists/ads.txt
WHITELISTS
You will find certain sites and services won’t work anymore. You will need to whitelist them, head over here for a list of Commonly Whitelisted Domains. You can also check the Query Log and see what domains were blocked and whitelist those with the button, then test your site or service.
FAMILY SHIELD DNS
Next navigate to Settings > DNS – Upstream DNS Servers section.
This is where your actual queries go out to, I am using OpenDNS Family Shield’s DNS servers. This provides a second layer of protection if for example an adult site is not on a blocklist, but Family Shield has it registered as one; the user will still not be able to get to the website.
Custom 1 (IPv4) - 208.67.222.123
Cusotm 2 (IPv4) - 208.67.220.123
VERIFYING YOUR CONFIGURATION
With everything configured, you may need to restart the Pi with the following command:
sudo rebootYou may also need to flush the DNS cache on your computer, open Command Prompt and run the following command:
ipconfig /flushdnsSo first we should test Pi-Hole and make sure it’s blocking things like ads. Go to this website to test ad blocking. You should see queries being generated on the Pi-Hole Admin Webpage.
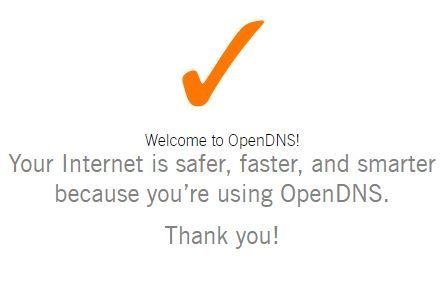
Now let’s test that we’re using the Upstream DNS servers we configured, OpenDNS Family Shield, go to this website, you should get an orange checkmark like below:
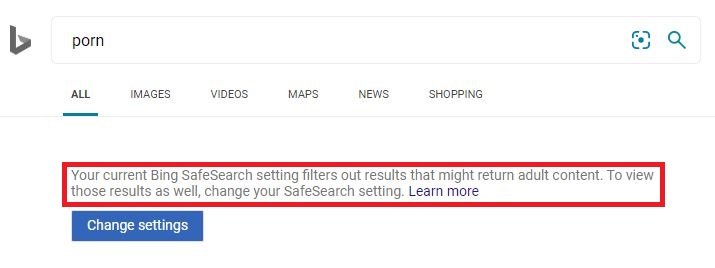
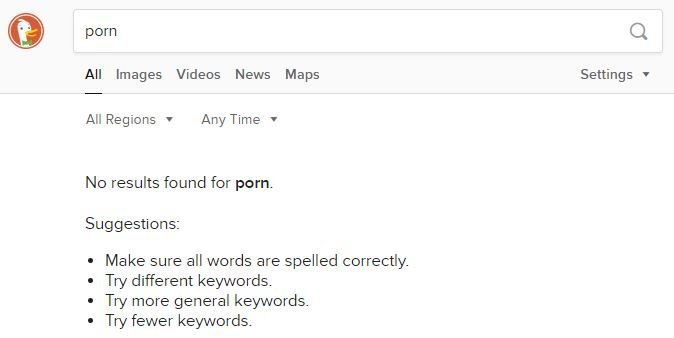
Now let’s test Safe Search being forced. Do some searches on Google, Bing, DuckDuckGo, and YouTube if you did that as well and see if you can pull adult content in the search results and image searches. You shouldn’t be able to.

Bing
DuckDuckGo
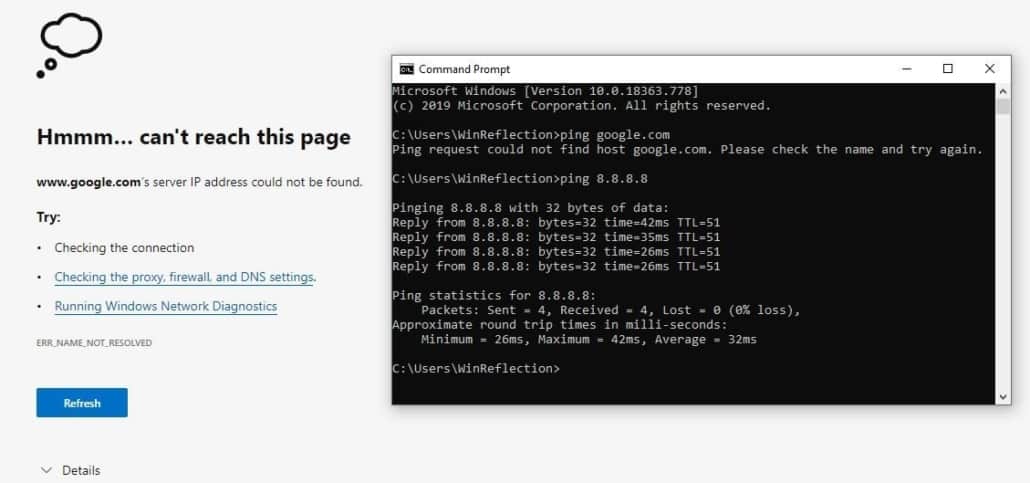
Now let’s test our circumvention prevention. I went ahead and set a custom DNS server on my computer’s network adapter, like shown in a previous image. I used 8.8.8.8 which is Google’s DNS server. I went ahead and tried to load google.com but could not reach it, I also tried manually pinging it. I was able to ping 8.8.8.8 but that’s because it’s just an ICMP request, we’re blocking traffic on port 53 to any IP other than 192.168.1.101.
Another thing we can do is ping google.com, bing.com and duckduckgo.com and see if those resolve to their safe search domain names we configured.
Microsoft Windows [Version 10.0.19042.868]
(c) 2020 Microsoft Corporation. All rights reserved.

C:\WINDOWS\system32>nslookup google.com
Server: PI-HOLE
Address: 192.168.1.101
Name: forcesafesearch.google.com
Address: 216.239.38.120
Aliases: google.com

C:\WINDOWS\system32>>nslookup bing.com
Server: PI-HOLE
Address: 192.168.1.101
Name: strict.bing.com
Address: 204.79.197.220
Aliases: bing.com

C:\WINDOWS\system32>nslookup duckduckgo.com
Server: PI-HOLE
Address: 192.168.1.101
Name: safe.duckduckgo.com
Address: 40.89.244.237
Aliases: duckduckgo.com
You can see above with the nslookup command that when I ping Google, Bing, or DuckDuckGo it resolves to their Safe or Strict counterparts and the request is hitting the Pi-Hole device as the DNS server. That is success!
UPDATING PI-HOLE
Connect to the Pi via SSH and login, below you will find the commands.
pihole -up : Updating Pi-Hole software to the latest version.
pihole -v : Verify that you have the latest version of Pi-hole already installed.

If using the PADD screen add-on with some kits:
cd ~
wget -N https://raw.githubusercontent.com/jpmck/PADD/master/padd.sh
sudo reboot
BACKING-UP YOUR WORK
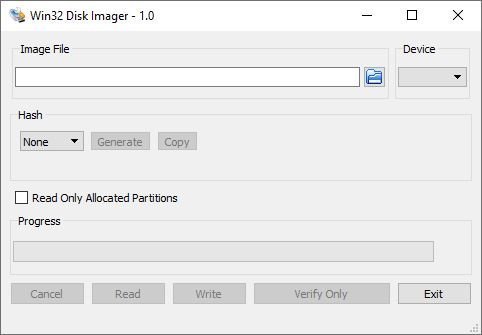
It should be noted that this was a lot of work and time to get right and SD-CARDs aren’t known for lasting forever. So, we should create a backup of the SD-CARD. For this we can use Win32 Disk Imager, you can find a portable version online, but I am not going to link unofficial builds here. You’re going to want the Win32DiskImager-1.0.0-binary. Insert the SD-CARD into the computer.
Note the Drive letter, then select under, “Device”, and simply select where you want the backup to go by clicking the folder icon, then select “Read”.
CONCLUSION
This was a lot to put together but when done it’s very effective. Pornography is very damaging, I have read countless stories of how it negatively affects people, their brains, their relationship with our Lord Jesus Christ, marriages and sex in general. The industry needs to be banned and action needs to be taken. While I am not perfect by any means, before coming to Christ I would occasionally view pornography.
Luckily, I grew up in a home with Dial-up internet so I couldn’t really view heavily as it just wouldn’t load at 26.4 kbps. When I came to Jesus after listening to someone’s testimony online, and I will dive into this more in the future, Jesus views people and their souls like His children. So, understanding how much Jesus loves us is a key to fighting pornography and while I have had some slip-ups with this sin in my walk with Christ, I would say through Jesus I have gained the victory over this sin and with these steps I have outlined in this guide.
I hope it will help you obtain the victory as well!
Hey folks, my name is Dex and you’ve landed on my website. Ponder this; was it by coincidence or did God bring you here? Either way, I hope you find something of value. We may not agree on everything, but that’s just part of the fun here!
It’s my hope here that you also become inspired to join the good fight against evil. There are no ads here, just truth bombs. So change your tune because the best is yet to come, and nothing can stop what’s coming!
John 3:16: For God so loved the world that he gave his one and only Son, that whoever believes in him shall not perish but have eternal life.
Very cool post thanks for the read.