 flaticon.com
Free Windows File Server | Hyper-V Server Core
Table of Contents
INTRO

A free Windows File Server is pretty cool. Microsoft’s Evaluation Center contains a nice hidden secret, Hyper-V Server 2019, or aka Hyper-V Server 2019 Core. This is a stripped-down version of Windows Server 2019 Core that is geared around Hyper-V. It does not require a license and receives updates.
MY HOME LAB
I have a home lab with two servers. A Dell PowerEdge R230 (4-bay 3.5″) 2 SSD drives in RAID 1 (OS) and another 2 SSD drives in RAID 1 (DATA). A Dell PowerEdge R730 (8-bay 2.5″) 2 SSD drives in RAID 1 (OS) and 6 SSD drives in RAID 10 (DATA). I do not have an active directory domain available on my local network to join these Hyper-V Server 2019 Core installs to. They will be part of a WORKGROUP, but this presents a challenge because Hyper-V Server 2019 Core is supposed to be joined to a domain for easier management and configuration. So, this guide will focus on WORKGROUP configuration.
These are my two Home Lab servers:
WR-SVR-VMM-01 (Dell – PowerEdge R230)
WR-SVR-VMM-02 (Dell – PowerEdge R730)
You will want to have a good naming convention, WR-SVR-VMM-01 is the name set in the Answer File below, so make sure to change that. So, get your naming convention in-order.
PREPARING FOR INSTALL

I installed Hyper-V Server 2019 with the AutoUnattend.xml Answer File below.
The passwords in these Answer Files are hashed in Base64, you can use an online decoder to get the value, which I will give you. It’s “Password01!” without quotes. Both the Administrator and Support user accounts will have this password, and you need to change them after the OS is installed. The dummy password is just to get things going that’s why it’s not a secure one.
Additionally, if you need to install to a different disk, you need to first boot the installation media and go into Command Prompt via Windows PE. See below for commands and output on one of my servers using DiskPart.
C:\Users\Administrator>diskpart

Microsoft DiskPart version 10.0.17763.1911

Copyright (C) Microsoft Corporation.
On computer: WR-SVR-VMM-01

DISKPART> list disk

Disk ### Status Size Free Dyn Gpt
-------- ------------- ------- ------- --- ---
Disk 0   Online        232 GB  0       B   *
Disk 1   Online        232 GB  1024    KB  *
The DiskIDs will be listed, and this is what will be seen when the OS installed. There are two lines in the Answer File with the DiskID. You need to replace “0” with the DiskID you want to install to. If you get this wrong, you will lose data wiping a different disk. If you do not see your disks, it’s most likely because Windows PE does not have drivers for your SATA or RAID controllers, and you will need to integrate those with DISM commands and then use the following DISM commands again to integrate the drivers or use third-party software like NTLite.
The easiest way to get the drivers you need is on a fully installed OS with a GUI; you simply use these commands to export all third-party drivers (.infs) into a folder. You will want to do this before installing Hyper-V Server 2019 since there is no GUI or Windows Desktop to do so after the fact. You will want to integrate into both the install.wim image and boot.wim images.
I have noticed when using the Answer File saved to a USB drive, sometimes Windows Setup boots-up before the chipset and USB controllers are ready, so you may need to click “Install” first, but after that the install should take off in unattended fashion. The only way around this is to integrate the AutoUnattend.xml file into the boot.wim image next to Windows Setup, this is explained in a post I made years ago in 2018 which you can find.
ANSWER FILE – OS INSTALLATION
<?xml version="1.0" encoding="utf-8"?>
<unattend xmlns="urn:schemas-microsoft-com:unattend">
    <settings pass="windowsPE">
        <component name="Microsoft-Windows-Setup" processorArchitecture="amd64" publicKeyToken="31bf3856ad364e35" language="neutral" versionScope="nonSxS" xmlns:wcm="http://schemas.microsoft.com/WMIConfig/2002/State" xmlns:xsi="http://www.w3.org/2001/XMLSchema-instance">
            <DiskConfiguration>
                <Disk wcm:action="add">
                    <CreatePartitions>
                        <CreatePartition wcm:action="add">
                            <Type>EFI</Type>
                            <Size>512</Size>
                            <Order>1</Order>
                        </CreatePartition>
                        <CreatePartition wcm:action="add">
                            <Extend>false</Extend>
                            <Type>MSR</Type>
                            <Order>2</Order>
                            <Size>128</Size>
                        </CreatePartition>
                        <CreatePartition wcm:action="add">
                            <Type>Primary</Type>
                            <Order>3</Order>
                            <Size>1024</Size>
                        </CreatePartition>
                        <CreatePartition wcm:action="add">
                            <Order>4</Order>
                            <Type>Primary</Type>
                            <Extend>true</Extend>
                        </CreatePartition>
                    </CreatePartitions>
                    <ModifyPartitions>
                        <ModifyPartition wcm:action="add">
                            <Format>FAT32</Format>
                            <Order>1</Order>
                            <PartitionID>1</PartitionID>
                        </ModifyPartition>
                        <ModifyPartition wcm:action="add">
                            <Order>2</Order>
                            <PartitionID>2</PartitionID>
                        </ModifyPartition>
                        <ModifyPartition wcm:action="add">
                            <Format>NTFS</Format>
                            <Order>3</Order>
                            <PartitionID>3</PartitionID>
                            <Label>Recovery</Label>
                            <TypeID>DE94BBA4-06D1-4D40-A16A-BFD50179D6AC</TypeID>
                        </ModifyPartition>
                        <ModifyPartition wcm:action="add">
                            <Format>NTFS</Format>
                            <Label>Windows</Label>
                            <Order>4</Order>
                            <PartitionID>4</PartitionID>
                        </ModifyPartition>
                    </ModifyPartitions>
                    <DiskID>0</DiskID>
                    <WillWipeDisk>true</WillWipeDisk>
                </Disk>
                <WillShowUI>OnError</WillShowUI>
            </DiskConfiguration>
            <ImageInstall>
                <OSImage>
                    <InstallFrom>
                        <MetaData wcm:action="add">
                            <Key>/IMAGE/NAME</Key>
                            <Value>Hyper-V Server 2019 SERVERHYPERCORE</Value>
                        </MetaData>
                    </InstallFrom>
                    <InstallTo>
                        <DiskID>0</DiskID>
                        <PartitionID>4</PartitionID>
                    </InstallTo>
                    <InstallToAvailablePartition>false</InstallToAvailablePartition>
                    <WillShowUI>OnError</WillShowUI>
                </OSImage>
            </ImageInstall>
            <UserData>
                <AcceptEula>true</AcceptEula>
            </UserData>
        </component>
        <component name="Microsoft-Windows-International-Core-WinPE" processorArchitecture="amd64" publicKeyToken="31bf3856ad364e35" language="neutral" versionScope="nonSxS" xmlns:wcm="http://schemas.microsoft.com/WMIConfig/2002/State" xmlns:xsi="http://www.w3.org/2001/XMLSchema-instance">
            <InputLocale>en-US</InputLocale>
            <SystemLocale>en-US</SystemLocale>
            <UILanguage>en-US</UILanguage>
            <UserLocale>en-US</UserLocale>
            <SetupUILanguage>
                <UILanguage>en-US</UILanguage>
            </SetupUILanguage>
        </component>
    </settings>
    <settings pass="oobeSystem">
        <component name="Microsoft-Windows-International-Core" processorArchitecture="amd64" publicKeyToken="31bf3856ad364e35" language="neutral" versionScope="nonSxS" xmlns:wcm="http://schemas.microsoft.com/WMIConfig/2002/State" xmlns:xsi="http://www.w3.org/2001/XMLSchema-instance">
            <InputLocale>en-US</InputLocale>
            <SystemLocale>en-US</SystemLocale>
            <UILanguage>en-US</UILanguage>
            <UserLocale>en-US</UserLocale>
        </component>
        <component name="Microsoft-Windows-Shell-Setup" processorArchitecture="amd64" publicKeyToken="31bf3856ad364e35" language="neutral" versionScope="nonSxS" xmlns:wcm="http://schemas.microsoft.com/WMIConfig/2002/State" xmlns:xsi="http://www.w3.org/2001/XMLSchema-instance">
            <AutoLogon>
                <Password>
                    <PlainText>false</PlainText>
                    <Value>UABhAHMAcwB3AG8AcgBkADAAMQAhAFAAYQBzAHMAdwBvAHIAZAA=</Value>
                </Password>
                <Enabled>true</Enabled>
                <LogonCount>2</LogonCount>
                <Username>Administrator</Username>
            </AutoLogon>
            <UserAccounts>
                <AdministratorPassword>
                    <PlainText>false</PlainText>
                    <Value>UABhAHMAcwB3AG8AcgBkADAAMQAhAEEAZABtAGkAbgBpAHMAdAByAGEAdABvAHIAUABhAHMAcwB3AG8AcgBkAA==</Value>
                </AdministratorPassword>
                <LocalAccounts>
                    <LocalAccount wcm:action="add">
                        <Password>
                            <PlainText>false</PlainText>
                            <Value>UABhAHMAcwB3AG8AcgBkADAAMQAhAFAAYQBzAHMAdwBvAHIAZAA=</Value>
                        </Password>
                        <Group>Administrators</Group>
                        <Name>Support</Name>
                    </LocalAccount>
                </LocalAccounts>
            </UserAccounts>
            <RegisteredOwner />
            <FirstLogonCommands>
                <SynchronousCommand wcm:action="add">
                    <CommandLine>Powershell.exe -ExecutionPolicy Unrestricted -File  "F:\Hyper-V-Server-Core-Custom.ps1"</CommandLine>
                    <Description>Run Custom PowerShell Script</Description>
                    <Order>1</Order>
                    <RequiresUserInput>false</RequiresUserInput>
                </SynchronousCommand>
            </FirstLogonCommands>
        </component>
    </settings>
    <settings pass="specialize">
        <component name="Microsoft-Windows-Shell-Setup" processorArchitecture="amd64" publicKeyToken="31bf3856ad364e35" language="neutral" versionScope="nonSxS" xmlns:wcm="http://schemas.microsoft.com/WMIConfig/2002/State" xmlns:xsi="http://www.w3.org/2001/XMLSchema-instance">
            <ComputerName>WR-SVR-VMM-01</ComputerName>
            <TimeZone>Central Standard Time</TimeZone>
            <RegisteredOwner />
        </component>
        <component name="Microsoft-Windows-TerminalServices-LocalSessionManager" processorArchitecture="amd64" publicKeyToken="31bf3856ad364e35" language="neutral" versionScope="nonSxS" xmlns:wcm="http://schemas.microsoft.com/WMIConfig/2002/State" xmlns:xsi="http://www.w3.org/2001/XMLSchema-instance">
            <fDenyTSConnections>false</fDenyTSConnections>
        </component>
    </settings>
    <cpi:offlineImage cpi:source="catalog:c:/temp/17763.737.190906-2324.rs5_release_svc_refresh_serverhypercore_oem_x64fre_en-us_1/sources/install_hyper-v server 2019 serverhypercore.clg" xmlns:cpi="urn:schemas-microsoft-com:cpi" />
</unattend>
When the install automatically logs in for the first time with Administrator it will run a PowerShell script that it will look for at drive letter F. If I run notepad.exe in Hyper-V Server Core and do File -> Open, I can see which drive letter my USB drive receives with the AutoUnattend.xml file on it, then I place the script on that drive and put the correct letter in the path in the Answer File. This script will do all of the configuring of Hyper-V Server 2019 Core.
This is also a good example of how you can further automate Windows installs with an Answer File, since we can do almost anything with PowerShell. I have imported Local Security Policies, GPOs, drivers, installed programs, edited the registry, placed shortcuts, and much more using PowerShell with these Answer Files. Here is the PowerShell script below. It will configure what you need to for WORKGROUP configuration, however some things in the script may reduce security of the Server, so keep that in-mind, edit as you see fit.
POWERSHELL SCRIPT POST-INSTALL
## Enable PowerShell Remoting

Enable-PSRemoting

## Enables CredSSP Authentication

Enable-WSManCredSSP -Role Server -Force

## Install Windows Feature Hyper-V PowerShell Tools

Install-WindowsFeature -Name "Hyper-V-Powershell"

## Install Windows Feature FS-Fileserver

Install-WindowsFeature -Name "FS-Fileserver"

## Allow ICMP (Ping) through Windows Firewall for IPv4 and IPv6

New-NetFirewallRule -Name Allow_ICMP_Ping_IPv4 -DisplayName "Allow ICMP Ping IPv4" -Description "Packet Internet Groper ICMPv4" -Protocol ICMPv4 -IcmpType 8 -Enabled True -Profile Any -Action Allow
New-NetFirewallRule -Name Allow_ICMP_Ping_IPv6 -DisplayName "Allow ICMP Ping IPv6" -Description "Packet Internet Groper ICMPv6" -Protocol ICMPv6 -IcmpType 8 -Enabled True -Profile Any -Action Allow

## Set Windows Diagnostic level (Telemetry) to Security

New-ItemProperty -Path "HKLM:\SOFTWARE\Policies\Microsoft\Windows\DataCollection" -Name 'AllowTelemetry' -PropertyType 'DWord' -Value '0' -Force

## Enable Firewall Rules

Set-NetFirewallRule -DisplayGroup "Virtual Machine Monitoring" -Enabled True
Set-NetFirewallRule -DisplayGroup "Remote Event Monitor" -Enabled True
Set-NetFirewallRule -DisplayGroup "Remote Shutdown" -Enabled True
Set-NetFirewallRule -DisplayGroup "Hyper-V" -Enabled True
Set-NetFirewallRule -DisplayGroup "Remote Scheduled Tasks Management" -Enabled True
Set-NetFirewallRule -DisplayGroup "Windows Remote Management" -Enabled True
Set-NetFirewallRule -DisplayGroup "Remote Desktop" -Enabled True
Set-NetFirewallRule -DisplayGroup "Remote Volume Management" -Enabled True
Set-NetFirewallRule -DisplayGroup "File and Printer Sharing" -Enabled True
Set-NetFirewallRule -DisplayGroup "Remote Event Log Management" -Enabled True
Set-NetFirewallRule -DisplayGroup "Performance Logs and Alerts" -Enabled True
Set-NetFirewallRule -DisplayGroup "Hyper-V Management Clients" -Enabled True
Set-NetFirewallRule -DisplayGroup "Remote Service Management" -Enabled True
Set-NetFirewallRule -DisplayGroup "Windows Defender Firewall Remote Management" -Enabled True
Set-NetFirewallRule -DisplayGroup "Windows Management Instrumentation (WMI)" -Enabled True
Set-NetFirewallRule -DisplayGroup "File Server Remote Management" -Enabled True

## Set Services

Set-Service -Name "Winmgmt" -StartupType Automatic
Set-Service -Name "WinRM" -StartupType Automatic

## Enable Remote Management

cd "C:\Windows\system32"; Configure-SMremoting.exe -Enable

## Set Windows Updates Schedule

Set-ItemProperty -Path "HKLM:\SOFTWARE\Policies\Microsoft\Windows\WindowsUpdate\AU" -Name 'AUOptions' -Value '4' -Force

## Install Windows Updates

$Updates = Start-WUScan -SearchCriteria "Type='Software' AND IsInstalled=0"
Install-WUUpdates -Updates $Updates

## Set Check Disk Scan by Marking Drive C: Dirty

fsutil dirty set c:

## Reboot Server

shutdown /r /f /t 60
CLIENT MACHINE CONFIGURATION
This script took me some time to perfect but it’s great, taking out a lot of the manual work. Once done, you will need to configure the Client machine. The Client machine will use Hyper-V Manager and Server Manager to configure your GUI-less Server’s features.
In Windows 10:
INSTALL THE HYPER-V MANAGEMENT TOOLS:
PS C:\Windows\system32>
Enable-WindowsOptionalFeature -Online -FeatureName Microsoft-Hyper-V-Tools-All -All
INSTALL THE RSAT TOOL FOR SERVER MANAGER:
PS C:\Windows\system32>
Add-WindowsCapability -Online -Name "Rsat.ServerManager.Tools~~~~0.0.1.0"
SET CONNECTION PROFILES TO PRIVATE:
The commands below will only work if the corresponding network adapter is active.
PS C:\Windows\system32>
Set-NetConnectionProfile -InterfaceAlias "Ethernet" -NetworkCategory Private
Set-NetConnectionProfile -InterfaceAlias "Wi-Fi" -NetworkCategory Private
ADD HOSTS FILE ENTRIES FOR SERVERS:
PS C:\Windows\system32>
Add-Content -Path C:\Windows\System32\drivers\etc\hosts -Value "`n192.168.1.10`tWR-SVR-VMM-01"
Add-Content -Path C:\Windows\System32\drivers\etc\hosts -Value "`n192.168.1.12`tWR-SVR-VMM-02"
CONFIGURE THE WINDOWS REMOTE MANAGEMENT (WS-MANAGEMENT) SERVICE:
PS C:\Windows\system32>
Set-Service -Name WinRM -StartupType Automatic
Start-Service -Name WinRM
ALLOW THE WINDOWS 10 CLIENT CREDENTIALS TO BE DELEGATED TO THE HYPER-V SERVER HOSTS:
PS C:\Windows\system32>
Enable-WSManCredSSP -Role Client -DelegateComputer "WR-SVR-VMM-01", "WR-SVR-VMM-02"

CredSSP Authentication Configuration for WS-Management
CredSSP authentication allows the user credentials on this computer to be sent to a remote computer. If you use CredSSP
authentication for a connection to a malicious or compromised computer, that computer will have access to your user
name and password. For more information, see the Enable-WSManCredSSP Help topic.
Do you want to enable CredSSP authentication?
[Y] Yes [N] No [S] Suspend [?] Help (default is "Y"): Y


cfg : http://schemas.microsoft.com/wbem/wsman/1/config/client/auth
lang : en-US
Basic : true
Digest : true
Kerberos : true
Negotiate : true
Certificate : true
CredSSP : true
ADD THE HYPER-V SERVER HOSTS TO THE TRUSTED HOSTS OF THE WINDOWS 10 CLIENT:
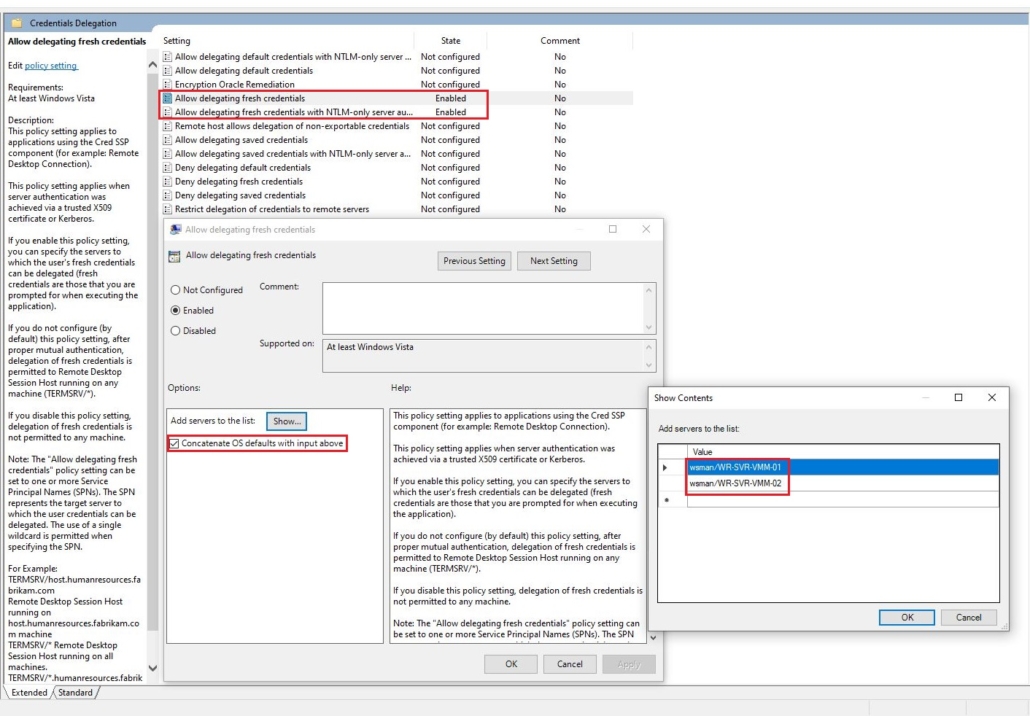
Note: After running the Enable-WSManCredSSP command above, it will enable the following Group Policy:
Computer Configuration\Administrative Templates\System\Credential Delegation\
Allow delegating fresh credentials: Enabled
You need to make sure that if adding more than one server, that each server is on its own line like shown below, otherwise I find that it won’t work. Also, I have found that when trying to add the Hyper-V server into Hyper-V Manager, it will fail unless I also configure the same for the following GPO which is probably due to the security settings set on the Hyper-V servers.
Computer Configuration\Administrative Templates\System\Credential Delegation\
Allow delegating fresh credentials with NTLM-only server authentication: Enabled
wsman/WR-SVR-VMM-01
wsman/WR-SVR-VMM-02
ADD SERVERS TO TRUSTED HOSTS LIST:
PS C:\Windows\system32>
Set-Item WSMan:\localhost\Client\TrustedHosts -Value WR-SVR-VMM-01 -Concatenate
Set-Item WSMan:\localhost\Client\TrustedHosts -Value WR-SVR-VMM-02 -Concatenate
You want to use the “-Concatenate” switch so that each server is added to the list, otherwise without it, the list will be replaced with just the host/s in the last command.
Once done, check that they’ve been added, see the command and output below:
PS C:\Windows\system32>
Get-Item WSMan:\localhost\Client\TrustedHosts | select Name,Value | Format-List


Name  : TrustedHosts
Value : WR-SVR-VMM-01,WR-SVR-VMM-02
CONFIGURE REMOTE MANAGEMENT SERVICE:
PS C:\Windows\system32>
winrm quickconfig

WinRM service is already running on this machine.
WinRM is not set up to allow remote access to this machine for management.
The following changes must be made:

Enable the WinRM firewall exception.
Configure LocalAccountTokenFilterPolicy to grant administrative rights remotely to local users.

Make these changes [y/n]? Y

WinRM has been updated for remote management.

WinRM firewall exception enabled.
Configured LocalAccountTokenFilterPolicy to grant administrative rights remotely to local users.
FINISHING – GPUPDATE AND RESTART CLIENT:
gpupdate /force
shutdown /r /f /t 60
HYPER-V MANAGER
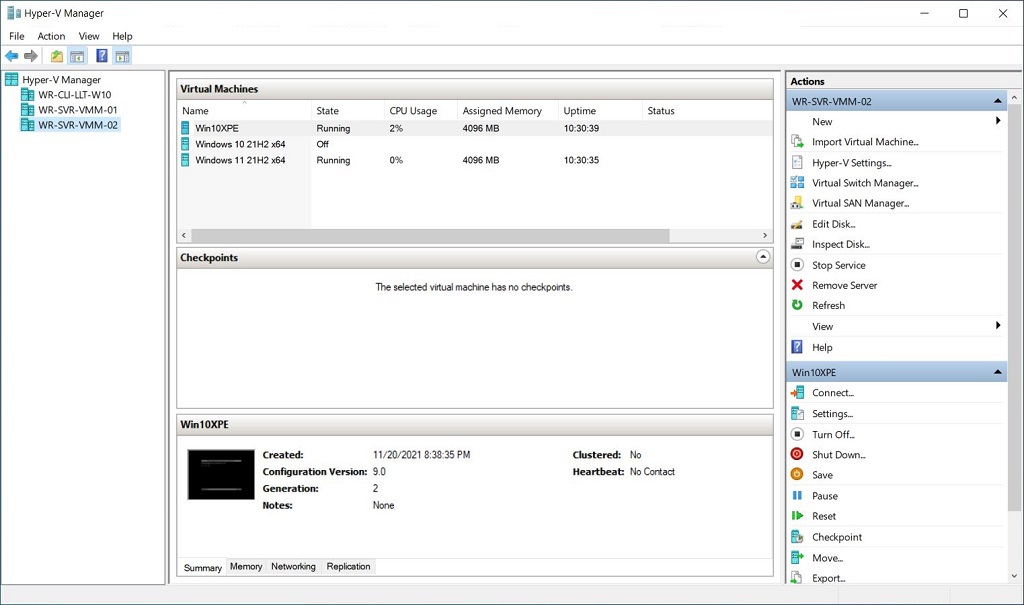
- Open up Hyper-V Manager:
- Right-Click on “Hyper-V Manager” and select “Connect to server…”.
- Select “Another computer” and type the name of your Hyper-V Server host.
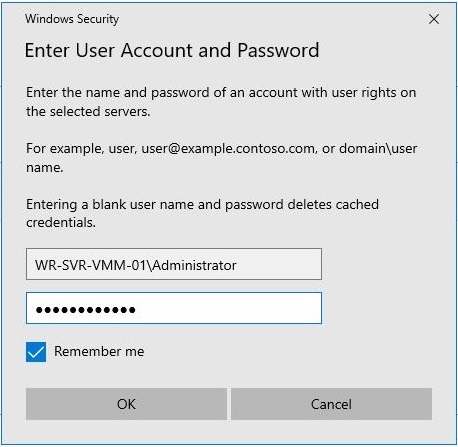
- Check “Connect as another user”, then use the local Administrator account of the Hyper-V Host.
- Check “Remember me”. Use %hostname%\Administrator.
- So, in this case, WR-SVR-VMM-01\Administrator
- Enter the password or that user account on the server.
Once done you should see the server appear in the list and you can start to configure Virtual Machines.
RSAT – SERVER MANAGER
Open Server Manager, select, “Add other servers to manage” and add your servers.
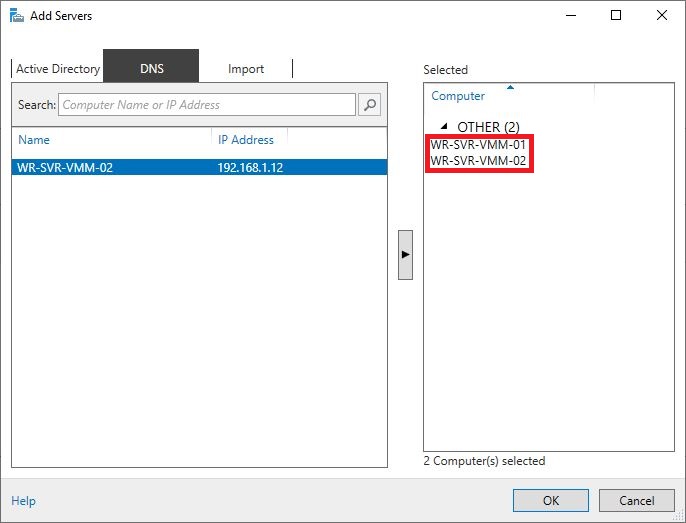
Once done, the servers will be shown in the list, but your Windows 10 client doesn’t have credentials yet to access its resources:
You will need to go to “All Servers” and right-click the servers and do “Manage As…” and use the Administrator credentials like when we added them to Hyper-V Manager.
Once done, you will see Server Manager show your servers as Online and you can access its resources. You will see Events and Services information as well.
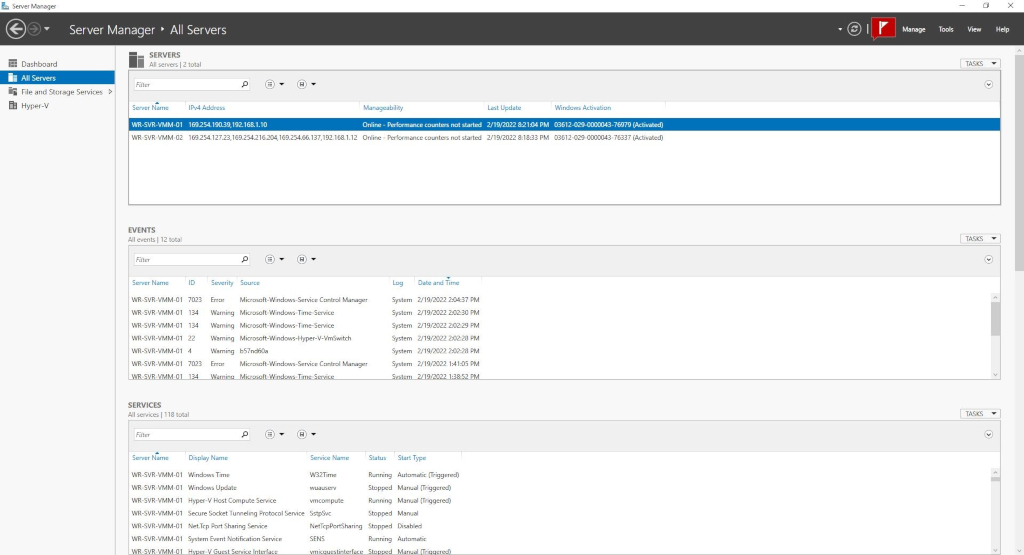
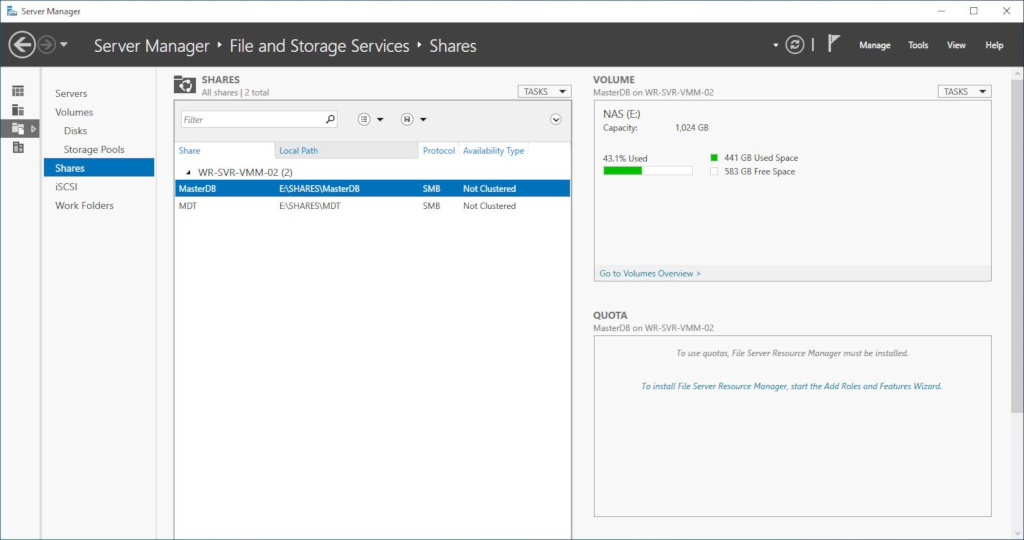
You can then go to “File and Storage Services” and start creating your shares.
INSTALL SERVER CORE APP COMPATIBILITY
Hyper-V Server 2019 like I said before is based on Server Core. With Server Core App Compatibility Feature on Demand (FOD) we can get access to the following:
- Microsoft Management Console (mmc.exe)
- Event Viewer (Eventvwr.msc)
- Performance Monitor (PerfMon.exe)
- Resource Monitor (Resmon.exe)
- Device Manager (Devmgmt.msc)
- File Explorer (Explorer.exe)
- Windows PowerShell (Powershell_ISE.exe)
- Disk Management (Diskmgmt.msc)
- Failover Cluster Manager (CluAdmin.msc)
The command to install via PowerShell is:
Add-WindowsCapability -Online -Name ServerCore.AppCompatibility~~~~0.0.1.0The install will take some time, and the server will need to be rebooted. Once it comes back up you will notice the theme of menus is a bit different, a darker blue color is used on window borders now and you can now run the programs listed above. Since this works so well, my post-install PowerShell script above can now have the following removed and should be set back to manual for startup type:
CONCLUSION
Well, there you have it, I said I would get it done and I did. I currently use this for my home lab, and it has made a world of difference in terms or organizing and testing. It’s free, receives updates for security, so it’s a home lab win. Now, I just need to make sure the SMTP settings configured in iDRAC for each of these servers are correct so I can receive email alerts if there are any issues like a disk failing in a RAID array so I can replace it.
Hey folks, my name is Dex and you’ve landed on my website. Ponder this; was it by coincidence or did God bring you here? Either way, I hope you find something of value. We may not agree on everything, but that’s just part of the fun here!
It’s my hope here that you also become inspired to join the good fight against evil. There are no ads here, just truth bombs. So change your tune because the best is yet to come, and nothing can stop what’s coming!
John 3:16: For God so loved the world that he gave his one and only Son, that whoever believes in him shall not perish but have eternal life.
Leave a Reply
Want to join the discussion?Feel free to contribute!