How to Enforce Pi-Hole DNS on Your UDM-Pro — No Bypass Allowed!

Table of Contents
🚀 Powering Your Network with UDM-Pro + Pi-Hole
Combining a Ubiquiti Dream Machine Pro (UDM-Pro) with Pi-Hole creates a powerful duo for network-wide ad blocking and DNS filtering. In a previous post, I detailed how to install and configure Pi-Hole on a router running DD-WRT firmware, including how to prevent users from bypassing Pi-Hole by using alternative DNS servers.
This summer, I migrated from DD-WRT to a Ubiquiti Unifi setup. In this post, I’ll show you how to block DNS circumvention on a UDM-Pro, integrating it seamlessly with your Pi-Hole.
🔐 Logging Into Your UDM-Pro
This guide assumes you already have Pi-Hole installed and configured, ready to be integrated with your Unifi system. For full context, check out my previous Pi-Hole setup post.
At the time of writing, my UDM-Pro runs firmware version 1.12.22 with the Network application at 7.2.92.
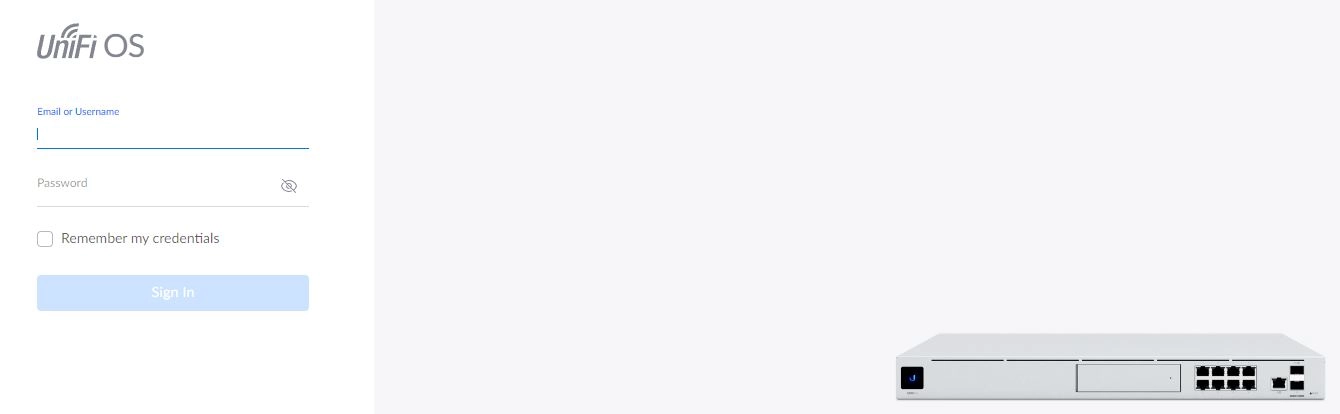
To start, log into your UDM-Pro’s web portal at the default IP address: 192.168.1.1.
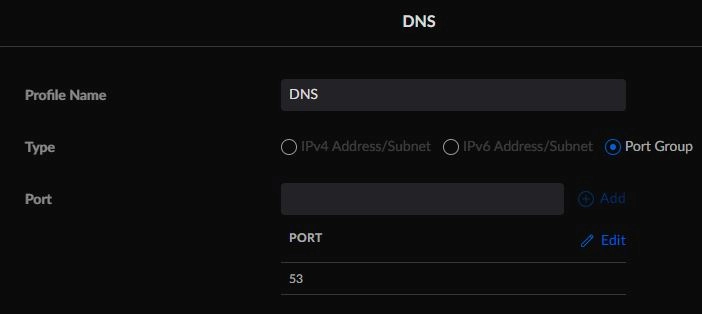
🛠️ Creating a DNS Port Group
- In the Network application, click Settings in the left sidebar.
- Select Profiles from the sidebar.
- Scroll down to Port and IP Groups.
- Create a new Port Group named DNS for port 53.
🔥 Setting Up Firewall Rules to Block DNS Bypass
Navigate to Settings > Firewall and Security in the Network application and create the following firewall rules:
- Rule 2000: Block unauthorized DNS traffic (TCP)
- Rule 2001: Block unauthorized DNS traffic (UDP)
I’ll share my exact configurations for these rules below.
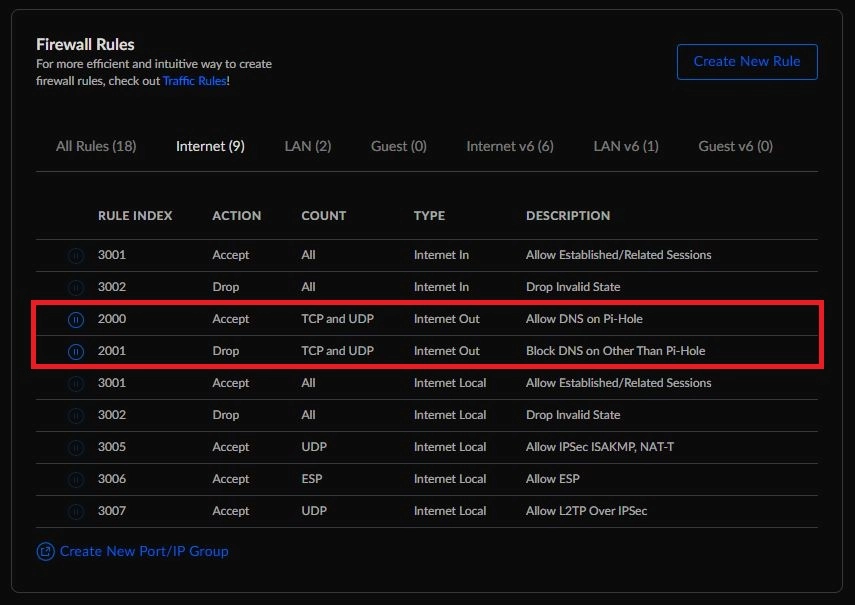
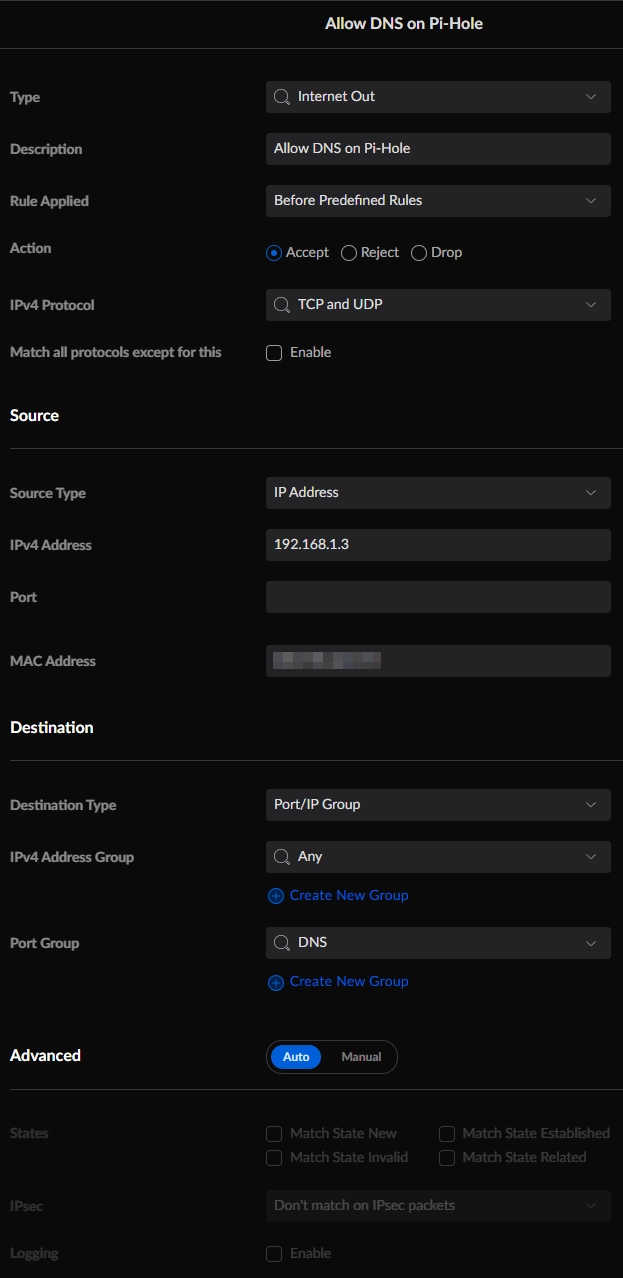
Here is the configuration for rule 2000:
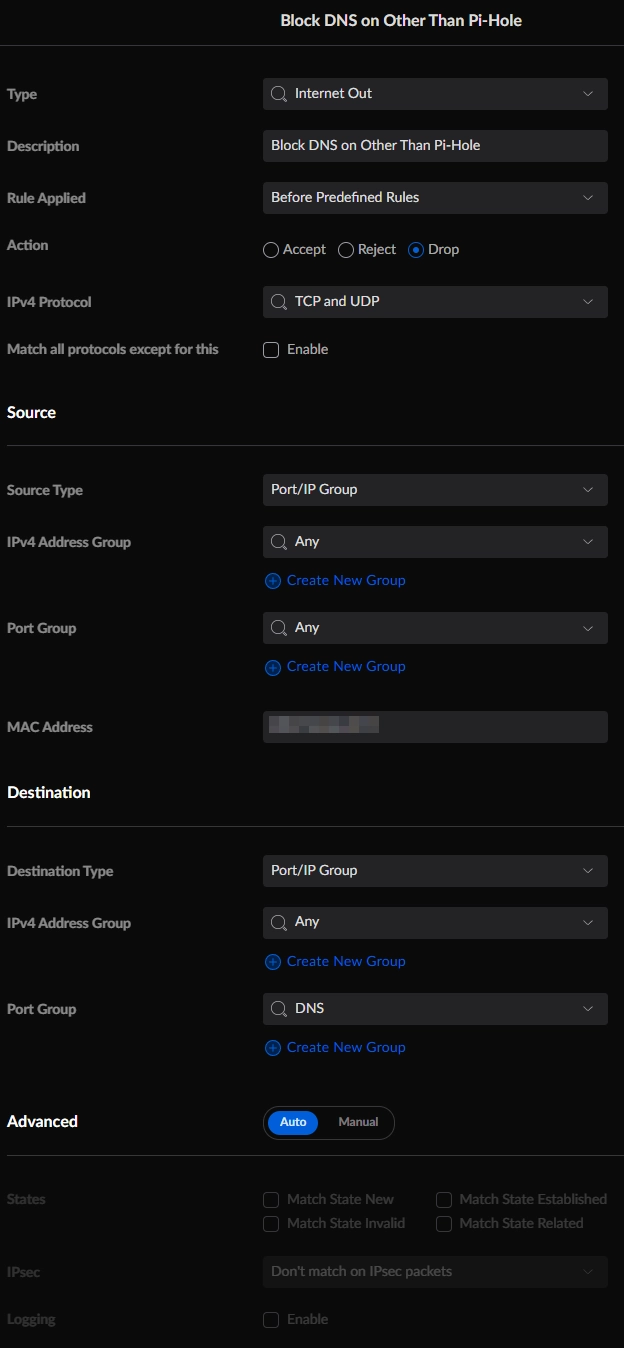
Here is the configuration for rule 2001:
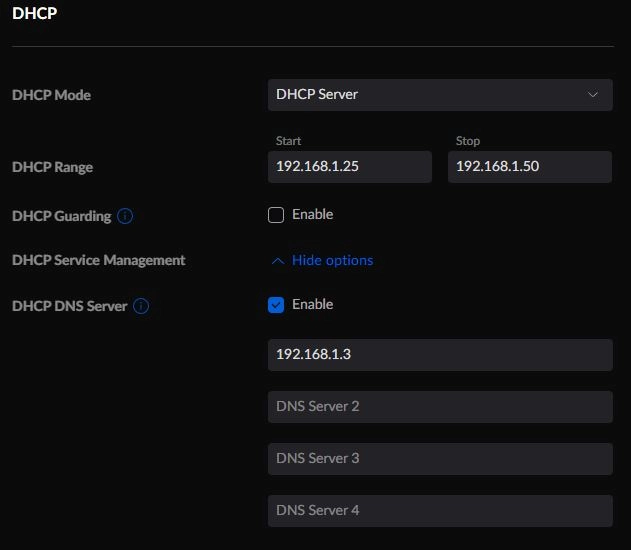
⚙️ Configuring the DNS Server on UDM-Pro
Next, point your UDM-Pro’s DHCP DNS server to your Pi-Hole device’s IP:
- Open the Network application.
- Click Settings in the left sidebar.
- Select Networks.
- Edit the Default network.
- Scroll to DHCP Service Management and click Show options.
- Enter your Pi-Hole’s IP address under DHCP DNS Server.
🔄 Redirecting DNS Requests to Pi-Hole (Better Than Blocking)
Instead of just blocking DNS requests to servers like Google DNS, you can redirect all DNS traffic to Pi-Hole. I originally didn’t have a solution for this, but now I do!
SSH into your UDM-Pro (enable SSH under Settings → Advanced) using Putty or your preferred SSH client, then run these commands (replace 192.168.1.3 with your Pi-Hole’s IP):
iptables -t nat -A PREROUTING ! -s 192.168.1.3 -p tcp --dport 53 -j DNAT --to 192.168.1.3
iptables -t nat -A PREROUTING ! -s 192.168.1.3 -p udp --dport 53 -j DNAT --to 192.168.1.3
iptables -t nat -A POSTROUTING -m iprange --src-range 192.168.1.2-192.168.1.254 -j MASQUERADE
Wait 30 seconds to a minute for the rules to take effect and clear your DNS cache (
ipconfig /flushdnson Windows) before testing.
I used a program called Putty to do this. You will need to enable SSH by going to the area before you select any of the Unifi applications, such as Network, Protect, etc, and then going to Settings -> Advanced -> SSH and enabling the option. Once done you can use Putty to SSH into your UDM-Pro.
- Username: root
- Password: The password you use to login to your UDM-Pro’s web interface.
- I believe this is the default when you enable SSH under, Settings (before any applications) -> System. If not it’s possible the password was changed to something else, but you can change it there. There is also SSH credential settings under Network -> Settings -> System -> Network Device SSH Authentication for directly accessing devices via SSH.
Paste each line one by one. It may take 30 seconds to a minute to see the changes and be sure to clear your DNS cache in Windows with the command ipconfig /flushdns before testing. These added commands will be removed after a reboot.
💻 Setting Up an On-Boot Script for DNS Redirection
To make the above iptables rules persistent across reboots you can have a script run at startup with this. I recently ran into a customer that uses primarily Chromebooks and had issues with people watching pornography. I configured them to use CleanBrowsing DNS, but it’s not working because I assume the Chromebooks are using Google DNS. The firewall rules above would prevent them from connecting to the internet.
So, I explained this, and they invited us to have Admin permissions to their Cloud Portal, then I used their VPN configuration to be able to SSH into their UDM-Pro from my office but before I did so I tested on my own equipment, and it works. Here is what I did.
- SSH into the UDM-Pro using Putty.
- Download Putty here.
curl -fsL "https://raw.githubusercontent.com/unifi-utilities/unifios-utilities/HEAD/on-boot-script/remote_install.sh" | /bin/shNext change to the directory where we will place our on-boot script/s.
cd /data/on_boot.dCreate our blank script file.
- If the curser gets stuck use Ctrl + C to get out, type “ls” to get a list of files in the current directory to confirm the blank file was created.
cat > 07-dns-redirection-on-port-53.shWe will now insert the following text into the blank script file with the VI editor.
- You must be in insert mode to edit, press “i” to get in then start adding lines to your script. When using Putty press the right-click key once to paste clipboard data into the terminal.
vi 07-dns-redirection-on-port-53.shOnce done putting in the lines like my example below, use Esc to get out of INSERT mode and then type, “:x”, then hit enter, to exit and save the changes.
#!/bin/sh

## Configure DNS Redirection on Port 53

iptables -t nat -A PREROUTING ! -s 192.168.1.3 -p tcp --dport 53 -j DNAT --to 192.168.1.3
iptables -t nat -A PREROUTING ! -s 192.168.1.3 -p udp --dport 53 -j DNAT --to 192.168.1.3
iptables -t nat -A POSTROUTING -m iprange --src-range 192.168.1.2-192.168.1.254 -j MASQUERADEIMPORTANT: I discovered that if you include the gateway in the IP range, it breaks the VPNs from connecting. Exclude the gateway to resolve this, in my example I started the range at 192.168.1.2 my gateway is at 192.168.1.1.
Restart the UDM-Pro and test.
🧪 Testing Your Setup
To test the commands, I disabled the firewall rules, 2000 and 2001 I created in this guide and set the network adapter on my computer to use Google’s DNS server at 8.8.8.8 and flushed the DNS cache in Windows with ipconfig /flushdns. Going to the OpenDNS Welcome page confirms that the changes are working.

I am using OpenDNS Family Shield IPs:
- 208.67.222.123
- 208.67.220.123
I like these because the welcome page they have helps with troubleshooting and testing.
Checking the query log in Pi-Hole shows that the DNS requests are getting to it. The downside is that you can’t see which client is querying what when using masquerade, as all client requests show up as from unifi.localdomain.
If you have decided to use CleanBrowsing DNS which forces Safe Search or implemented custom DNS changes to your Pi-Hole or other self-hosted DNS server using either Hosts file edits and/or CNAME changes with the values below, then you should test that also.
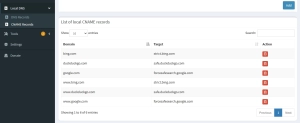
🔍 Pi-Hole DNS Records & Safe Search Enforcement
To enforce Safe Search and restrict YouTube, add these local DNS records to Pi-Hole:
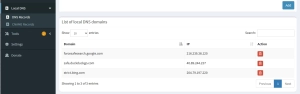
To enforce Safe Search and restrict YouTube, add these local DNS records to Pi-Hole:
216.239.38.120  restrict.youtube.com
216.239.38.119  restrictmoderate.youtube.com
216.239.38.120  forcesafesearch.google.com
204.79.197.220  strict.bing.com
40.89.244.237   safe.duckduckgo.com
🔍 Pi-hole CNAM Records
Add these CNAME records to enforce Safe Search across Google, Bing, and DuckDuckGo:
# Google Safe Search
cname=google.com,forcesafesearch.google.com
cname=www.google.com,forcesafesearch.google.com
# Bing Safe Search
cname=bing.com,strict.bing.com
cname=www.bing.com,strict.bing.com
# DuckDuckGo Safe Search
cname=duckduckgo.com,safe.duckduckgo.com
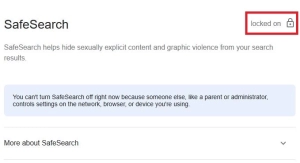
cname=www.duckduckgo.com,safe.duckduckgo.com💻 Checking Safe Search is Working
You can also restrict YouTube.
# YouTube Restricted
# You can also implement a moderate setting instead. Replace restrict.youtube.com with restrictmoderate.youtube.com

cname=youtube.com,restrictmoderate.youtube.com
cname=www.youtube.com,restrictmoderate.youtube.com
cname=m.youtube.com,restrictmoderate.youtube.com
cname=youtubei.googleapis.com,restrictmoderate.youtube.com
cname=youtube.googleapis.com,restrictmoderate.youtube.com
cname=youtube-nocookie.com,restrictmoderate.youtube.com
cname=www.youtube-nocookie.com,restrictmoderate.youtube.com
Hopefully a feature will be added in the firmware for this in the future, so we don’t need to use third-party scripts.
⚠️ Limitations & DNS Over HTTPS/TLS Challenges
DNS has changed in last few years with DNS over TLS (DoT), and DNS over HTTPS (DoH). Windows clients, and browsers like Microsoft Edge and Google Chrome have their own options to enable these:
- Chrome settings -> Privacy and Security -> Security -> Use secure DNS
- Edge settings -> Privacy, search, and services -> Use secure DNS to specify how to lookup the network address for websites
Because of this, Pi-Hole can be circumvented. I tried figuring out a way to work with these features rather than block them but couldn’t figure out a good way. DoT works with port 853 so I could block that port completely. DoH works over port 443 and we can’t block that port. Some people are installing packages on Pi-Hole which act as proxies and then implement firewall rules.
I think the best option is to use a firewall with frequent signature updates implemented for very aggressive blocking where DNS is not relied on completely. You could manage Windows endpoints with browser extensions or Group Policies to help but that won’t stop people on unmanaged devices. It appears firewall signatures may be the easiest way to block things now which usually aren’t free, but for security you’re going to have to pay up.
✅ Conclusion
That’s it! Try changing your DNS settings manually on a client device to test if the Pi-Hole redirection is working. If your tech-savvy kids start complaining about blocked content, you know your setup is effective!
🌿 Final Thoughts
Implementing Pi-Hole alongside your UDM-Pro is a smart way to regain control over your network’s DNS traffic, block unwanted content, and improve overall security. While DNS over HTTPS and TLS pose new challenges, combining firewall rules, DNS redirection, and careful network configuration can greatly reduce bypass attempts.
Remember, no solution is completely foolproof, but this setup provides a solid foundation—and a great learning experience—for managing your home or small business network. Stay curious, keep experimenting, and enjoy a cleaner, safer browsing environment!
My name is Dex, author at WinReflection.
I am a Christian, conservative, truth-seeker, and problem-solver who is not afraid to be vocal about important or controversial issues—silence leads to death. There’s more to life than the worldly status quo, and that’s why many are sad and depressed—they’re suffocating. Truth and purpose can bring fresh air into one’s life, and that’s my mission. My sidebar content should not trigger you, the proof is all there.
📖 John 3:16: For God so loved the world that he gave his one and only Son, that whoever believes in him shall not perish but have eternal life.
I’m running UDM Network 9.2.87, which I believe is the latest version at the time of writing. I see under Settings > Profiles > Network Objects. The first option is for Port, the second IPVv4 Address/Subnet, the third IPv6 Address/Subnet. I assume what you wrote above for this sectiion related to “Port Groups” is the same as I see now for “Port”.
I only ask because it’s not 1:1 for following how you managed to setup your system per below:
In the Network application, click Settings in the left sidebar.
Select Profiles from the sidebar.
Scroll down to Port and IP Groups.
Create a new Port Group named DNS for port 53.
This is a great guide for this level of setup. I have been happily using Pi-Hole without the rules you show in this guide for catching the DNS messages that bypass Pi-Hole. I thought I would try changing that. I have two questions:
1) This page is written with the assumption that the user has only one Pi Hole set up. I have two for redundancy in case one drops out for whatever reason. I have tried setting up an IP Group in addition to a Port group and substituting the IP Group for the source in your “Allow DNS on Pi-Hole” rule. Does this make sense to you?
2) More importantly, perhaps this whole page should be updated for the latest versions of UnifiOS and Network since there have been quite a few changes to NAT , Rules, and Firewalls recently. I have been toying around with translating your “REDIRECT DNS REQUESTS TO PI-HOLE OPTION” to the Network->Settings->Routinig->NAT screen rules, which I think translate into your iptables commands and won’t require the on-boot-script option to keep the settings persistent after reboot or update to the UDM Pro. I have been playing with the setting there but I can’t figure out for sure how to implement the two Pi-hole set-up on that screen. Any assistance pointing in the right direction would be welcomed.
Thanks, and God Bless,
Lee
Hey Dex,
Does the script still work under the newly released firmware 4.0.6? Just got a UDM PRO, coming from pfsense and missing out the DNS redirect rules and also port forwarding from my wire guard gateway. Hope to get this done with your article.
Thx Dirk
Do you have any recommendations what to do, if Pi-hole fails? Because Fallback dns servers don’t work, in my case.
Hi Dex,
Thank you so much for your article. It is very well done and extremely helpful to kickstart the process. I have a Unifi Dream Machine Special Edition (UDM-SE). I’d like to send you screenshots of what I did in the UDM-SE GUI to make it work as they are a little different. I also found that I needed to NOT include MAC for the “Block DNS on Other Than Pi-Hole IPv4” rule, otherwise it blocked the Pi-hole. Of course, I’m not certain what MAC you blurred out in your screen shot for the deny rule.
Hi WinReflection,
Thanks for your informative post. I have a couple of questions they may need simple answers so excuse my n00bness :)
i) the MAC address you have obscured, what device is that for and is it essential to making the rules work ?
ii) After creating the above rules and following your guide (I stopped at the “REDIRECT DNS REQUESTS TO PI-HOLE OPTION” bit), I still get ads/banners popping up on the popular speedtest site of https://www.speedtest.net/ , not on the initial homepage but on the results page after the tests have run (https://ibb.co/zmTX7F9)
Am I doing anything wrong ?
Cheers
Hi winreflection.com owner, Thanks for the educational content!
Can I use this approach to apply these rules only to one of the VLAN’s as opposed to all of the VLAN’s? I would like to use the Firewall rules using the GUI if I can, to keep it simple.
I found a relatively straightforward way to do this on the current GUI (Unify OS 2.5.11): under the “Firewall and Security” tab, scroll down to “Port Forwarding” and then click “Create New Forwarding Rule.” From there, type in your desired parameters. I only had one device noticeably misbehaving, so my rule is simple: https://imgur.com/usYNLs4
-“Source” is the fixed IP of the offending device (in my case a smart TV). However, presumably you could instead use an entire IP address range (i.e. 192.168.30.1/24) if you wanted to redirect your entire VLAN.
-“Port” and “Destination port” obviously would both be 53
-“Forward IP” is the fixed IP of my Raspberry PI with AdGuard/PiHole
-“Protocol” is both
As someone who does not relish the idea of messing around with CLI (I have no coding knowledge and don’t want to break anything I can’t fix), this was easy for me. It persists throughout updates/reboots, and doesn’t require leaving the Unify GUI. If you have multiple devices or subnets you’d like to include, just make multiple rules.
Excellent, thank you. Yes, a range 192.168.3.15-192.168.3.18 works
Hmmm after watching the logs, I disagree. The interface this also affects is WAN In thus any errors would allow DNS traffic INTO your network. I know because the initial setting “ANY” was set and I see a few DNS rejections from outside my LAN. This was a first. The rule blocked an external IP from going to another external IP for DNS.
On the other hand, it did redirect internal DNS traffic to the PiHole (as desired).
My concern and reason why I disabled this rule was the potential of allowing external traffic via DNS ports. Risk is not worth it.
I did this and now my Google Hubs won’t work. I think they require google DNS. any thoughts?