 flaticon.com
Uninstall Store Apps | PowerShell
Table of Contents
INTRO

We can uninstall built-in Windows apps with PowerShell. Windows 10 installs with an abundance of apps that use system resources, consume network data, update automatically, and display notifications and many of these apps are only usable once you link Windows 10 with a Microsoft account.
We’re going to use a post-install method utilizing a PowerShell script with some slight modifications that will be run under the built-in Administrator account. For Pro editions of Windows 10 you can use the Local Users and Groups MMC snap-in interface to enable the account. For Home editions of Windows 10, the MMC snap-in will not be available but the account can be enabled by running the following command in Command Prompt:
net user Administrator /active:yesEXCEPTIONS AND LOGGING
However, there are some apps we aren’t going to remove, specifically apps like the Store and others that are linked with certain GUI interface elements as we want to maintain the integrity of these elements. An example would be the OneNote app. If you expand the “Action Center”, there is a built-in “Note” button which opens “OneNote”. In my opinion, because there is a GUI button for it, I do not want to remove the app linked to it.
The PowerShell script we will be running was not created by me but by a guy named Ben Hunter. He deserves the credit for the script and his original post while for Windows 8.1, works for Windows 10 as well and you can find it here. I have modified it a little bit. Remember, we want to make it so that new users that login to Windows do not get the apps we want removed installed. We need to remove the provisioned packages and not just the packages installed for the current user account.
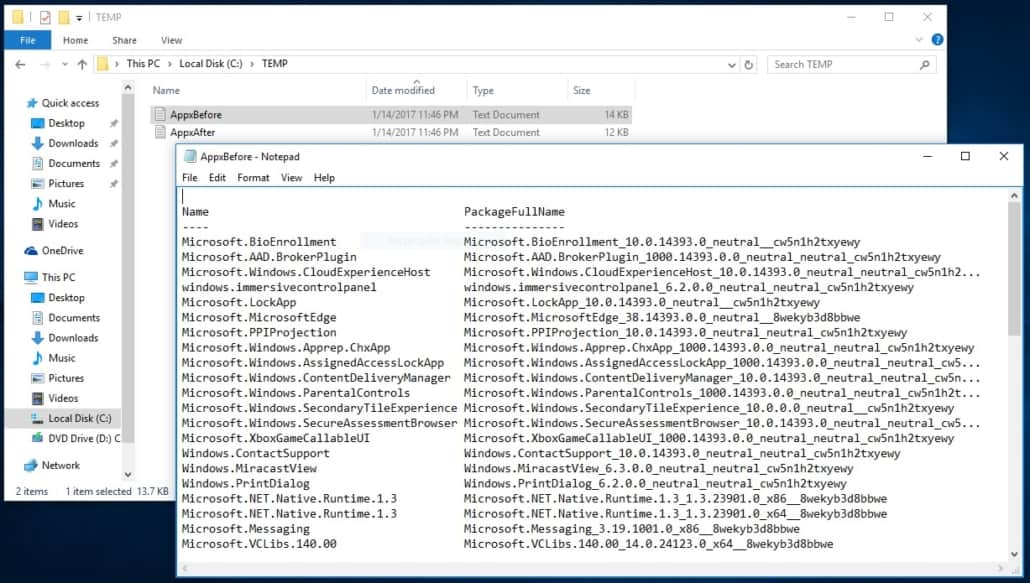
This is where the script comes in as it will remove both the packages for each app, we call it to remove which are the apps in the $AppList. My modifications create a folder on the root of C: called “TEMP” and creates an AppxBefore.txt file which is a list of the currently installed and running packages before the script runs and an AppxAfter.txt file which is a list of the currently installed and running packages after the script runs. I felt this was important as we can see results with the script and then adjust the $AppList as necessary.
MODIFYING THE $APPLIST
Below I have placed the script code, feel free to modify the “$AppList” to your liking. Simply copy the code into notepad and rename with a .ps1 file extension. In this guide the script will be called “Win10RemoveApps.ps1”.
New-Item C:\TEMP -Type Directory
Get-AppxPackage | Select Name, PackageFullName >"C:\TEMP\AppxBefore.txt"

$AppsList = "Microsoft.WindowsCommunicationsApps","Microsoft.XboxApp","Microsoft.SkypeApp","Microsoft.MicrosoftSolitaireCollection","Microsoft.ZuneMusic","Microsoft.ZuneVideo","Microsoft.MicrosoftOfficeHub","Microsoft.3DBuilder","king.com.CandyCrushSodaSaga","9E2F88E3.Twitter","Microsoft.Messaging","Flipboard.Flipboard","ShazamEntertainmentLtd.Shazam","ClearChannelRadioDigital.iHeartRadio","Microsoft.MinecraftUWP","XboxOneSmartGlass"

ForEach ($App in $AppsList)
{
    $PackageFullName = (Get-AppxPackage $App).PackageFullName
    $ProPackageFullName = (Get-AppxProvisionedPackage -Online | Where {$_.Displayname -eq $App}).PackageName
        Write-host $PackageFullName
        Write-Host $ProPackageFullName
    If ($PackageFullName)
    {
        Write-Host "Removing Package: $App"
        Remove-AppxPackage -Package $PackageFullName
    }
    Else
    {
        Write-Host "Unable to find package: $App"
    }
        If ($ProPackageFullName)
    {
        Write-Host "Removing Provisioned Package: $ProPackageFullName"
        Remove-AppxProvisionedPackage -Online -PackageName $ProPackageFullName
    }
    Else
    {
        Write-Host "Unable to find provisioned package: $App"
    }

}

Get-AppxPackage | Select Name, PackageFullName >"C:\TEMP\AppxAfter.txt"
UNINSTALL STORE APPS
Now that you have the script saved locally on the machine, we wish to run it on, we are ready to run it. Let’s open Windows PowerShell, not ISE, and running it as Administrator. In order to run scripts, we have to set Windows to allow it by entering the following command:
Set-ExecutionPolicy Unrestricted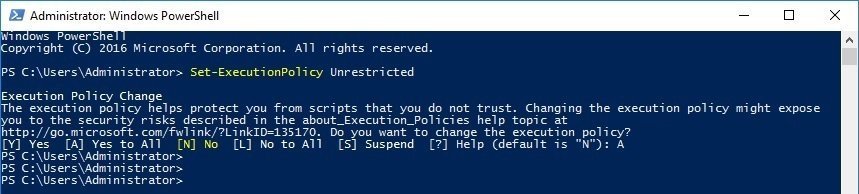
Next, navigate to the directory of where you saved the script using cd commands. For example, “cd C:\Scripts”. Then once in the directory, type “. /” then the name of the script and in our case, it will be “Win10RemoveApps.ps1”. So, for example, below:
./Win10RemoveApps.ps1
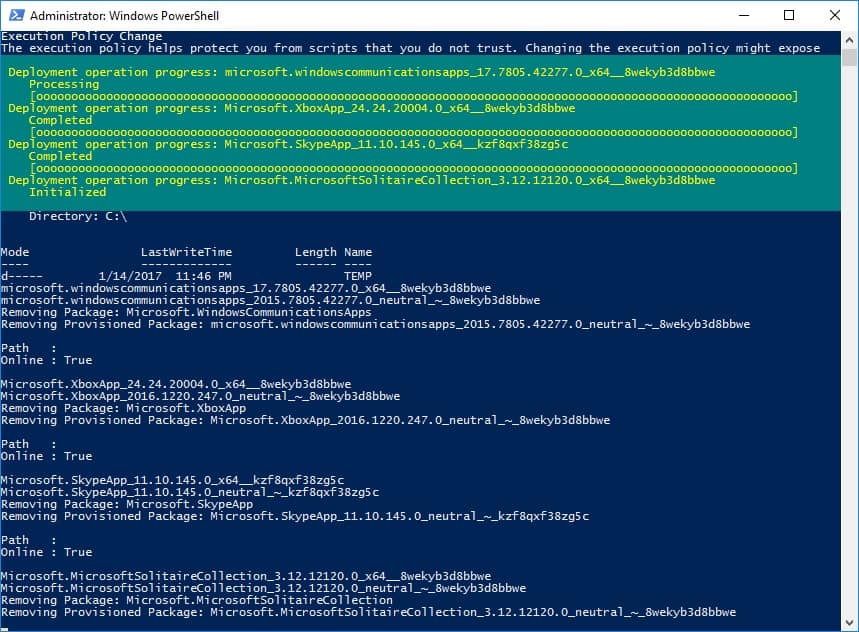
Below you will see how the script outputs when running.
After the script runs make sure to set the execution policy back to what it was.
Set-ExecutionPolicy RestrictedSome things I should note. Since this is a post-install method it’s possible that for issues in which the Start Menu can show remnants of apps that were removed. Some apps will be removed but their listing in the Start Menu will stay and have a blank icon. Some of these you can remove by right-clicking them and selecting uninstall, but other won’t give you that option.
Most people probably won’t care but if not, you can just delete the user profile and login again, and the Start Menu will be proper. Because we removed the provisioned packages, the apps we just removed will not return. Just make sure to back up your files before removing the user profile.
FIX APPX PACKAGE ISSUES | USERNAME CHANGE
After the name change of a user account in AD, when the user logs into Windows via their AD account onto the organization’s domain, their Windows 10 Store Apps may fail to start, open, or crash.
Try re-registering the Windows 10 AppX packages: Add the user account affected to the Local Administrators group on the affected client machine. Have the user login and try the commands below in PowerShell or in Command Prompt executing PowerShell:
Get-AppxPackage | ForEach-Object { Add-AppxPackage -DisableDevelopmentMode -Register ($_.InstallLocation + 'AppxManifest.xml')}If the above command does not work, try this other variation of it below:
Get-AppxPackage | ForEach-Object { Add-AppxPackage -DisableDevelopmentMode -Register ($_.InstallLocation + '\AppxManifest.xml')}CONCLUSION
Well, there you go, now just unpin the useless shortcuts and rearrange the Start Menu and it will have a much cleaner look without the useless junk. Also, the script can be utilized in a Task Sequence via MDT when imaging computers, although a more preferred method is to remove the apps before the OS even installs by modifying the install.wim image of the installation source media.
Hey folks, my name is Dex and you’ve landed on my website. Ponder this; was it by coincidence or did God bring you here? Either way, I hope you find something of value. We may not agree on everything, but that’s just part of the fun here!
It’s my hope here that you also become inspired to join the good fight against evil. There are no ads here, just truth bombs. So change your tune because the best is yet to come, and nothing can stop what’s coming!
John 3:16: For God so loved the world that he gave his one and only Son, that whoever believes in him shall not perish but have eternal life.
Leave a Reply
Want to join the discussion?Feel free to contribute!